Hayward Pro Logic Model: AQL-CHEM-3 Installation and Operation - Page 5
Installation, Installation Checklist, Operation - pool control
 |
View all Hayward Pro Logic manuals
Add to My Manuals
Save this manual to your list of manuals |
Page 5 highlights
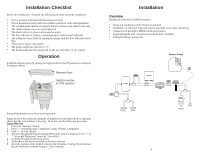
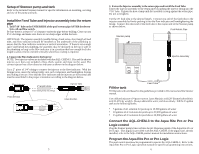
Installation Checklist Before the installation is finished, the following checklist should be completed. • Pool is properly balanced and functioning correctly • Unit is mounted securely and in accordance with local codes and regulations • The recommended amount of properly diluted acid has been added to the tank • The child-resistant cap is securely tightened • The check valve is in place and oriented properly • The flow indicator is in place, oriented properly, and mounted vertically • The tubing has been filled by running the pump until the flow indicator shows flow • There are no leaks in the system • The pump output has been set to "5" • The homeowner has been instructed on the use and safety of the system Operation Enable the Stenner pump by putting the toggle switch in the ON position according to the diagram below. Remove Roof Switch must be in "ON" position Installation Overview Installation of the AQL-CHEM-3 requires: • Setup and installation of the Stenner pump/tank • Installation of the Feed Tube and Injector assembly to the return plumbing • Connection of the AQL-CHEM-3 to the pool control • Programming the pool control for use with the AQL-CHEM-3 • Filling the Stenner pump/tank Stenner Pump Input Output Reinstall the protective roof for normal operation. Purge air out of the system by using the 15 minute force feed until the flow indicator shows that the acid solution is flowing. To do this, use the following procedure: Aqua Rite Pro 1. Press the "Settings" button. 2. Press ">" repeatedly until "Chemistry Config. Wizard" is displayed. 4. Push "+" to start Wizard. 5. Advance through the Wizard until pH Reduction Control is displayed. Use "+" or "-" to set pH Reduction Control to "Forced On". 6. Continue through the Wizard and exit. 7. Verify that acid solution is visible at the flow indicator. 8. After the system is fully primed, return to the Chemistry Config. Wizard and set the pH Reduction Control setting to "Auto Sensing". 7 FROM FROM POOL SPA TO TO SPA POOL 4
-
 1
1 -
 2
2 -
 3
3 -
 4
4 -
 5
5 -
 6
6
 |
 |
