Hayward Salt & Swim® 3C Salt & Swim 3C Owner's Manual - Page 6
Use Only Hayward Genuine Replacement Parts
 |
View all Hayward Salt & Swim® 3C manuals
Add to My Manuals
Save this manual to your list of manuals |
Page 6 highlights
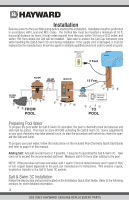
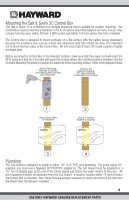
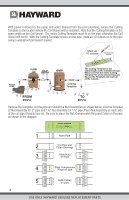
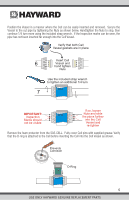
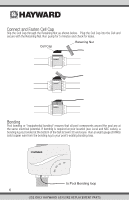
With power removed to the pump and water drained from the pool plumbing, secure the Cutting Template to the location where the Cell Vessel will be installed. Note that the Cutting Template is the same width as the Cell Vessel. The entire Cutting Template must fit on the pipe otherwise the Cell Vessel will not fit. With the Cutting Template secure on the pipe, mark all 10 cutouts on to the pipe using a waterproof permanent marker. Mark all 10 cutouts Permanent Marker Indicating Marks Cut Pipe Here I ndicait ngM arks C tuP ipeH ree I ndicati ngMar ks Cut Pi peHer e FILTER PUMP CUTTING TEM PLATE 1 . S e c ur e ly h ol d th is C u t tin g T e m pl at e to th e d es ir e d pi pe . T h e en t ire l e ng th of th e G u i de m u s t fit in t h e lo c at io n w h er e th e c e l ve s se l w il b e in s ta l ed . 2 . W ith a w a te rp r o f p e rm a n e nt m a r ke r, m a r k th e c ut ,c o m p re s si on rin g , an d i nd ic a to r m a rk c u to u t o n t o th e p ip e . 3 . R e m o v e C ut ti ng T e m p la te a n d c ut p ip e a t bo t h lo ca t io ns . 4 . S li d e N ut s o n to t he pi pe w ith t hr e ad s f ac in g t he cu t e nd s . 5 . S li d e th e C o m p re s io n R i ng s o v er t he m ar k in gs m ad e o n t he p ip e . 6 . S li d e th e S p ac e rs b e tw e e n th e c u t en d a n d th e C o m p re s si on R in gs . 7 . I ns e rt th e C e l V e s e bl e tw e e n th e c u te n d s a nd s li d e th e N u ts t o en g a ge th e th re a d s o n t he C el Vl e s se l. 8 . H a n d ti gh te n a n d c on t in ue to ti g ht en N ut s a n ad d it io na l 1 /4 t ur n w it h th e in c lu d ed S t ra p Wr e nc h . 9 . T h e b ac k o f th e ti gh t en e d N u ts s h ou ld be lo ca te d o n t he I n di ca ti n g M a rk s. I fn o t, lo o se n N u ts a n d re - po s it o n th e C e l V es s el .N o t e: w h e n p ro pe r ly in s ta l ed , th e c u tp ip e s d o N O T g o fu l y i nt o th e C e l V es s e l. FROM POOL TO POOL Remove the Template, cut the pipe and install the Nut Assemblies as shown below. Use the included 2" Nut Assembly for 2" pipe and 1½" Nut Assembly for 1½" pipe. Place Nut Assembly on each side of the cut pipe (threads face in). Be sure to place the Nut, Compression Ring and Collar on the pipe as shown in the diagram. Indicating Marks Cut Pipe Here CUTTING TEMPLATE Securely hold or tape this Cutting Template to the desired Cell Vessel installation location. Use a waterproof permanent marker to mark the pipe. When finished, there should be 12 marks on the pipe. Follow procedures on the Installation Quick Start Guide to complete Vessel installation. 1 Mark Pipe 2 Cut Pipe and Clean Shavings 3 Slide Nuts on Pipe 4 Slide Compression Rings on pipe 5 Slide Collars on pipe 4 USE ONLY HAYWARD GENUINE REPLACEMENT PARTS
-
 1
1 -
 2
2 -
 3
3 -
 4
4 -
 5
5 -
 6
6 -
 7
7 -
 8
8 -
 9
9 -
 10
10 -
 11
11 -
 12
12 -
13
-
14
-
15
-
16
-
17
-
18
-
19
-
20
-
21
-
22
-
23
-
24
 |
 |
