Hayward Salt & Swim Salt & Swim Installation Quick Start Guide - Page 2
Installation Quick Start Guide - manual
 |
View all Hayward Salt & Swim manuals
Add to My Manuals
Save this manual to your list of manuals |
Page 2 highlights
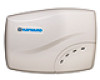
Salt & SwimTM Installation Quick Start Guide STEP 2: Determine where Cell Vessel will be installed The Cell Vessel must be the very last component installed in the pool's return piping before the water returns back to the pool. It can be installed vertically or horizontally and requires approximately 10 inches of straight pipe at the installation location. Use the included Cutting Template to aid in marking and cutting the pipe. The entire Cutting Template must fit on the pipe otherwise the Cell Vessel will not fit. Secure the Template and use a permanent marker to mark all 10 cutouts. STEP 3: Install Nut Assembly Follow the procedure below to install the Nut Assembly. STEP 4: Install Cell Vessel STEP 5: Insert Cell Remove the foam protector from the Cell. Fully cover Cell pins with supplied grease. Verify that the O-ring is attached to the Cell before inserting the Cell into the Cell Vessel as shown. STEP 6: Attach Cap Plug in Cell Cap and secure with Retaining Nut. STEP 7: Plug in Linecord With the pump off and water chemistry adjusted (see Water Chemistry Quick Start Guide), plug linecord into a 120 VAC ground fault circuit interrupter (GFCI) safety outlet or an outlet protected by a ground fault circuit breaker (GFCB). If local codes require bonding, see manual. Run the pump for 5 minutes or until all air is out of the system. Check for leaks and then turn the pump off. STEP 8: Calibrate Flow Switch IMPORTANT! 1. After being powered on for the first time, the Salt & Swim will display a blinking INADEQUATE WATER FLOW LED and a solid STANDING BY LED. Keep the Salt & Swim powered for the remainder of this procedure. 2. Turn the filter pump ON. Make sure that full flow is achieved (no air in the system) and run the pump for at least 15 seconds. 3. Turn the filter pump OFF for 15 seconds. 4. The Salt & Swim should now display a solid INADEQUATE WATER FLOW and a solid STANDING BY LED. The Flow Switch Calibration procedure is complete. You can now turn on your filter pump and begin normal operation. 092464 RevB
-
 1
1 -
 2
2
 |
 |