HealthRider Crosstrainer 800s Elliptical Uk Manual - Page 6
the Console Bracket until the Upper Wire Harness is
 |
View all HealthRider Crosstrainer 800s Elliptical manuals
Add to My Manuals
Save this manual to your list of manuals |
Page 6 highlights
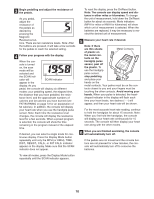
5. Hold the Console Bracket (26) near the Upright (2), and locate the wire extending from the bottom of the Console Bracket. Carefully pull the upper end of the Upper Wire Harness (79) to remove any slack, and tie the wire around the Upper Wire Harness, as shown in the inset drawing. Carefully pull the wire up through the Console Bracket until the Upper Wire Harness is extending from the top of the Console Bracket. Then, untie the wire and discard it. Insert the Console Bracket (26) into the Upright (2). Be careful to avoid pinching the Upper Wire Harness (79). Attach the Console Bracket with three M8 x 25mm Button Screws (57) and three M8 Split Washers (74). 5 26 57 74 2 Wire 79 79 74 57 6. Whilst another person holds the Console (5) near the Console Bracket (26), connect the wires on the Console to the Upper Wire Harness (79) and the Pulse Wire Harness (80). Insert the Wire Harnesses down into the Upright (2). Attach the Console (5) to the Console Bracket (26) with four M4 x 16mm Screws (66). Be careful to avoid pinching the wire harnesses. Attach the Water Bottle Holder (63) to the Upright (2) with two M4 x 19mm Screws (39). 6 5 Console Wires 80 66 2 79 26 63 39 7. The Console (5) requires four "D" batteries (not included); alkaline batteries are recommended. Look under the Console and locate the battery cover. (Note: The drawing shows the Console removed for clarity.) Press the tab on the battery cover and remove it. Insert four batteries into the console, making sure that the batteries are oriented as shown by the diagram inside the Console. Reattach the battery cover to the Console. 7 5 Batteries Battery Cover 6
-
 1
1 -
 2
2 -
 3
3 -
 4
4 -
 5
5 -
 6
6 -
 7
7 -
 8
8 -
 9
9 -
 10
10 -
 11
11 -
 12
12 -
13
-
14
-
15
-
16
 |
 |
