HealthRider H550i Treadmill English Manual - Page 8
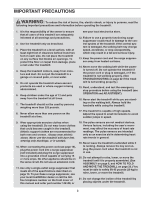
Press the Lock Knob Sleeve 56 into the left Upright 69. - folding treadmill
 |
View all HealthRider H550i Treadmill manuals
Add to My Manuals
Save this manual to your list of manuals |
Page 8 highlights
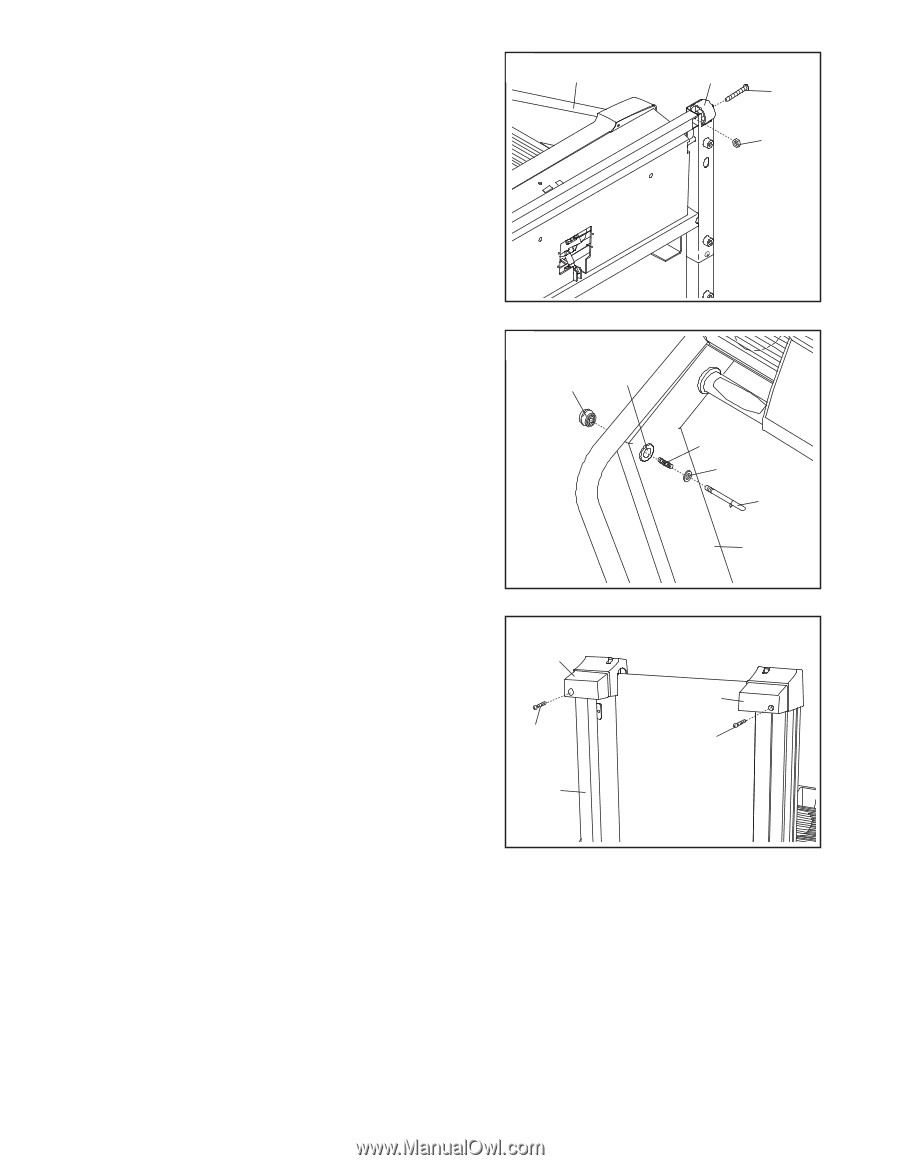
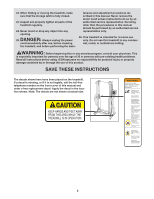
5. Attach a Wheel (95) to the base of the Uprights (69) with a Wheel Bolt (94) and a Nut (20). Do not overtighten 5 69 the Wheel Nut; the Wheel should turn freely. Attach the other Wheel (not shown) in the same way. With the help of a second person, carefully raise the Uprights (69) to a vertical position. 95 94 20 6. Press the Lock Knob Sleeve (56) into the left Upright (69). If necessary, use a rubber mallet to fully insert the Lock Knob Sleeve. 6 Knob 56 Remove the knob from the pin. Make sure that the collar and the spring are on the pin. Next, insert the pin into the Lock Knob Sleeve (56) and the left Upright (69), and tighten the knob back onto the pin. Spring Collar Pin 69 7. Place the treadmill in the storage position (see HOW TO FOLD THE TREADMILL FOR STORAGE on page 20). 7 49 Identify the Right Endcap Foot (50). Attach the Right Endcap Foot to the bottom of the Right Endcap (58) with 50 a Foot Screw (74). 74 Next, attach the Left Endcap Foot (49) to the bottom of 74 the Left Endcap (96) with a Foot Screw (74). Lower the treadmill Frame (110) (see HOW TO LOWER 110 THE TREADMILL FOR USE on page 21). 8. Make sure that all parts are properly tightened before you use the treadmill. Note: Extra hardware may be included. Keep the included allen wrench in a secure place; the allen wrench is used to adjust the walking belt (see page 23). To protect the floor or carpet from damage, place a mat under the treadmill. 8
-
 1
1 -
2
-
 3
3 -
 4
4 -
 5
5 -
 6
6 -
 7
7 -
 8
8 -
 9
9 -
 10
10 -
 11
11 -
 12
12 -
 13
13 -
14
-
15
-
16
-
17
-
18
-
19
-
20
-
21
-
22
-
23
-
24
-
25
-
26
-
27
-
28
-
29
-
30
 |
 |