HP 10842 Plinth Rack Option Kit Installation Instructions - Page 2
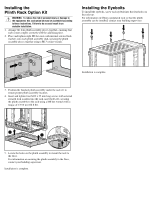
Installing the, Plinth Rack Option Kit, Installing the Eyebolts
 |
View all HP 10842 manuals
Add to My Manuals
Save this manual to your list of manuals |
Page 2 highlights
Installing the Plinth Rack Option Kit WARNING: To reduce the risk of personal injury or damage to the equipment, this rack option kit must be assembled according to these instructions. Failure to do so could result in an unstable installation. 1. Arrange the four plinth assembly pieces together, ensuring that each corner couples correctly with the adjoining piece. 2. Place and tighten eight M8 hex nuts with internal serrated lock washers onto each plinth assembly stud, securing the plinth assembly pieces together using a M13 socket wrench. Installing the Eyebolts To install the eyebolts, screw each eyebolt into the four holes on the rack top. For information on lifting a populated rack so that the plinth assembly can be installed, contact your building supervisor. Installation is complete. 3. Position the finished plinth assembly under the rack (1) to ensure proper plinth assembly location. 4. Insert and tighten four M12 x 25 mm long screws with external serrated lock washers into the rack caster holes (2), securing the plinth assembly to the rack using a M8 hex wrench with a torque of 135 N⋅m (100 ft⋅lb). 1 1 2 5. Locate the holes on the plinth assembly to mount the rack to the floor. For information on securing the plinth assembly to the floor, contact your building supervisor. Installation is complete.
-
 1
1 -
 2
2
 |
 |
