HP 2000-2b30DX User Guide - Windows 7 - Page 57
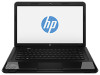
Turn over the hard drive, then disconnect the hard drive cable
 |
View all HP 2000-2b30DX manuals
Add to My Manuals
Save this manual to your list of manuals |
Page 57 highlights
Remove the hard drive: 1. Loosen the hard drive cover screw (1) (or screws depending on your model), and then lift up (2) and remove the cover (3). 2. Disconnect the hard drive cable (1) from the system board. 3. Lift the hard drive (2) out of the hard drive bay. NOTE: After removing the hard drive from the computer, you must remove the hard drive bracket to access the hard drive itself. 4. Turn over the hard drive, then disconnect the hard drive cable (1) from the hard drive. 5. Pull the sides of the hard drive bracket (2) out and away from the hard drive. Improving performance 47
-
 1
1 -
2
-
3
-
4
-
5
-
6
-
7
-
8
-
9
-
10
-
11
-
12
-
13
-
14
-
15
-
16
-
17
-
18
-
19
-
20
-
21
-
22
-
23
-
24
-
25
-
26
-
27
-
28
-
29
-
30
-
31
-
32
-
33
-
34
-
35
-
36
-
37
-
38
-
39
-
40
-
41
-
42
-
43
-
44
-
45
-
46
-
47
-
48
-
49
-
50
-
51
-
 52
52 -
 53
53 -
 54
54 -
 55
55 -
 56
56 -
 57
57 -
 58
58 -
 59
59 -
 60
60 -
 61
61 -
 62
62 -
63
-
64
-
65
-
66
-
67
-
68
-
69
-
70
-
71
-
72
-
73
-
74
-
75
-
76
-
77
-
78
-
79
-
80
-
81
-
82
-
83
-
84
-
85
-
86
-
87
-
88
-
89
 |
 |

Remove the hard drive:
1.
Loosen the hard drive cover screw
(1)
(or screws depending on your model), and then lift up
(2)
and remove the cover
(3)
.
2.
Disconnect the hard drive cable
(1)
from the system board.
3.
Lift the hard drive
(2)
out of the hard drive bay.
NOTE:
After removing the hard drive from the computer, you must remove the hard drive
bracket to access the hard drive itself.
4.
Turn over the hard drive, then disconnect the hard drive cable
(1)
from the hard drive.
5.
Pull the sides of the hard drive bracket
(2)
out and away from the hard drive.
Improving performance
47