HP 2700n Service Manual - Page 206
Open tray X or front door, Open front door and clear jam
 |
View all HP 2700n manuals
Add to My Manuals
Save this manual to your list of manuals |
Page 206 highlights
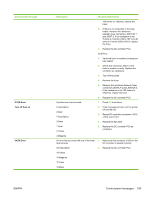
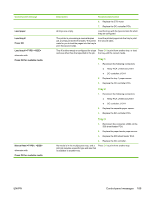
Control-panel message Invalid driver Press OK Jam in output bin alternates with Open front door or top cover Jam in print paper path alternates with Open front door and clear jam Jam in print paper path alternates with Open front door or top cover Jam in print paper path alternates with Open tray X or front door Jam in tray X alternates with Clear jam and then press OK Description The driver is not correct for this printer. Recommended action Select the correct printer driver. A jam has occurred in the fuser area or the output area. 1. Open the front door and top cover and clear the jam. For more information, see Jams on page 194. 2. If the problem persists, replace the fuser. 3. Replace the DC controller PCA. A jam has occurred inside the front door. 1. Open the front door and clear the jam. For more information, see Jams on page 194. 2. If the problem persists, replace the ETB. 3. The drive gears might be damaged. If they are, replace the pickup-drive assembly. 4. Replace the DC controller PCA. A jam has occurred in the fuser area or the drum area. 1. Open the front door and top cover and clear the jam. For more information, see Jams on page 194. 2. If the problem persists, replace the fuser. 3. Replace the DC controller PCA. A jam has occurred in the input area from the 1. indicated tray or inside the front door. Open the tray and the front door and clear the jam. For more information, see Jams on page 194. 2. If the tray 1 pickup roller is worn, replace it. 3. Clean the separation pad, and replace it if necessary. 4. Replace the MP tray pickup assembly. 5. Replace the ETB motor. 6. Replace the DC controller PCA. A page is jammed in the tray that is indicated. 1. Open the tray and clear the jam. For more information, see Jams on page 194. 2. If the pickup rollers are worn, replace them. 3. Clean the separation pad, and replace it if necessary. 4. Replace the registration rollers if they are damaged. 5. Replace the pickup-drive assembly. 188 Chapter 6 Troubleshooting ENWW
-
 1
1 -
2
-
3
-
4
-
5
-
6
-
7
-
8
-
9
-
10
-
11
-
12
-
13
-
14
-
15
-
16
-
17
-
18
-
19
-
20
-
21
-
22
-
23
-
24
-
25
-
26
-
27
-
28
-
29
-
30
-
31
-
32
-
33
-
34
-
35
-
36
-
37
-
38
-
39
-
40
-
41
-
42
-
43
-
44
-
45
-
46
-
47
-
48
-
49
-
50
-
51
-
52
-
53
-
54
-
55
-
56
-
57
-
58
-
59
-
60
-
61
-
62
-
63
-
64
-
65
-
66
-
67
-
68
-
69
-
70
-
71
-
72
-
73
-
74
-
75
-
76
-
77
-
78
-
79
-
80
-
81
-
82
-
83
-
84
-
85
-
86
-
87
-
88
-
89
-
90
-
91
-
92
-
93
-
94
-
95
-
96
-
97
-
98
-
99
-
100
-
101
-
102
-
103
-
104
-
105
-
106
-
107
-
108
-
109
-
110
-
111
-
112
-
113
-
114
-
115
-
116
-
117
-
118
-
119
-
120
-
121
-
122
-
123
-
124
-
125
-
126
-
127
-
128
-
129
-
130
-
131
-
132
-
133
-
134
-
135
-
136
-
137
-
138
-
139
-
140
-
141
-
142
-
143
-
144
-
145
-
146
-
147
-
148
-
149
-
150
-
151
-
152
-
153
-
154
-
155
-
156
-
157
-
158
-
159
-
160
-
161
-
162
-
163
-
164
-
165
-
166
-
167
-
168
-
169
-
170
-
171
-
172
-
173
-
174
-
175
-
176
-
177
-
178
-
179
-
180
-
181
-
182
-
183
-
184
-
185
-
186
-
187
-
188
-
189
-
190
-
191
-
192
-
193
-
194
-
195
-
196
-
197
-
198
-
199
-
200
-
 201
201 -
 202
202 -
 203
203 -
 204
204 -
 205
205 -
 206
206 -
 207
207 -
 208
208 -
 209
209 -
 210
210 -
 211
211 -
212
-
213
-
214
-
215
-
216
-
217
-
218
-
219
-
220
-
221
-
222
-
223
-
224
-
225
-
226
-
227
-
228
-
229
-
230
-
231
-
232
-
233
-
234
-
235
-
236
-
237
-
238
-
239
-
240
-
241
-
242
-
243
-
244
-
245
-
246
-
247
-
248
-
249
-
250
-
251
-
252
-
253
-
254
-
255
-
256
-
257
-
258
-
259
-
260
-
261
-
262
-
263
-
264
-
265
-
266
-
267
-
268
-
269
-
270
-
271
-
272
-
273
-
274
-
275
-
276
-
277
-
278
-
279
-
280
-
281
-
282
-
283
-
284
-
285
-
286
-
287
-
288
-
289
-
290
-
291
-
292
-
293
-
294
-
295
-
296
-
297
-
298
-
299
-
300
-
301
-
302
-
303
-
304
-
305
-
306
-
307
-
308
-
309
-
310
-
311
-
312
-
313
-
314
-
315
-
316
-
317
-
318
-
319
-
320
-
321
-
322
-
323
-
324
-
325
-
326
-
327
-
328
-
329
-
330
-
331
-
332
-
333
-
334
-
335
-
336
-
337
-
338
-
339
-
340
-
341
-
342
-
343
-
344
-
345
-
346
-
347
-
348
 |
 |
