HP 311-1025NR HP Pavilion dm1 HP Mini 311 Compaq Mini 311 - Maintenance and Se - Page 117
Using Windows Backup and Restore, Using system restore points, When to create restore points
 |
UPC - 884962639306
View all HP 311-1025NR manuals
Add to My Manuals
Save this manual to your list of manuals |
Page 117 highlights
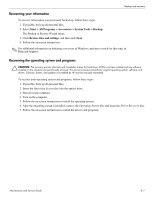
Backup and recovery To copy only the active window, press alt+fn+prt sc. To copy the entire screen, press fn+prt sc. 3. Open a word-processing document, and then select Edit > Paste. 4. Save the document. ■ You can back up your information to an optional external hard drive, a network drive, or discs. ■ When backing up to discs, use any of the following types of discs (purchased separately): CD-R, CD-RW, DVD+R, DVD-R, or DVD±RW. The discs you use will depend on the type of optical drive installed in your computer. ✎ DVDs store more information than CDs, so using them for backup reduces the number of recovery discs required. ■ When backing up to discs, number each disc before inserting it into the optical drive of the computer. Using Windows Backup and Restore To create a backup using Windows Backup and Restore, follow these steps: ✎ Be sure that the computer is connected to AC power before you start the backup process. ✎ The backup process may take over an hour, depending on file size and the speed of the computer. 1. Select Start > All Programs > Maintenance > Backup and Restore. 2. Follow the on-screen instructions to set up and create a backup. ✎ Windows includes the User Account Control feature to improve the security of your computer. ✎ You may be prompted for your permission or password for tasks such as installing software, running utilities, or changing Windows settings. Refer to Help and Support for more information. Using system restore points When you back up your system, you are creating a system restore point. A system restore point allows you to save and name a snapshot of your hard drive at a specific point in time. You can then recover back to that point if you want to reverse subsequent changes made to your system. ✎ Recovering to an earlier restore point does not affect data files saved or e-mails created since the last restore point. You also can create additional restore points to provide increased protection for your system files and settings. When to create restore points ■ Before you add or extensively modify software or hardware ■ Periodically, whenever the system is performing optimally ✎ If you revert to a restore point and then change your mind, you can reverse the restoration. Maintenance and Service Guide 8-3
-
 1
1 -
2
-
3
-
4
-
5
-
6
-
7
-
8
-
9
-
10
-
11
-
12
-
13
-
14
-
15
-
16
-
17
-
18
-
19
-
20
-
21
-
22
-
23
-
24
-
25
-
26
-
27
-
28
-
29
-
30
-
31
-
32
-
33
-
34
-
35
-
36
-
37
-
38
-
39
-
40
-
41
-
42
-
43
-
44
-
45
-
46
-
47
-
48
-
49
-
50
-
51
-
52
-
53
-
54
-
55
-
56
-
57
-
58
-
59
-
60
-
61
-
62
-
63
-
64
-
65
-
66
-
67
-
68
-
69
-
70
-
71
-
72
-
73
-
74
-
75
-
76
-
77
-
78
-
79
-
80
-
81
-
82
-
83
-
84
-
85
-
86
-
87
-
88
-
89
-
90
-
91
-
92
-
93
-
94
-
95
-
96
-
97
-
98
-
99
-
100
-
101
-
102
-
103
-
104
-
105
-
106
-
107
-
108
-
109
-
110
-
111
-
 112
112 -
 113
113 -
 114
114 -
 115
115 -
 116
116 -
 117
117 -
 118
118 -
 119
119 -
 120
120 -
 121
121 -
 122
122 -
123
-
124
-
125
-
126
-
127
-
128
-
129
-
130
-
131
-
132
-
133
-
134
-
135
-
136
-
137
-
138
 |
 |