HP 4500 HP Color LaserJet 4500, 4500 N, 4500 DN Printer - Toner Cartridge Trou - Page 2
Insert cartridges completely, Rotate carousel, carousel brake release, black channels, light channels
 |
View all HP 4500 manuals
Add to My Manuals
Save this manual to your list of manuals |
Page 2 highlights
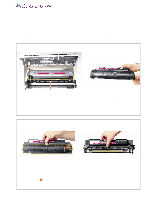
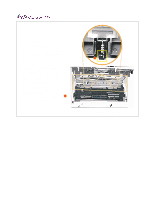
Top view of printer with the top door open B A A A B 3. Insert the cartridges all the way into the carousel As each cartridge is inserted into the carousel, round posts A on both ends of the cartridge fit into channels on both sides of the printer. Make sure the posts slide all the way to the bottom of the channels. A square tab or key B on the front of each cartridge fits into a cutout in the printer. Make sure the square tab is all the way down in the cutout. Check that the square tab and cutout are in alignment before inserting each cartridge. If a cartridge isn't inserted all the way into the printer the carousel may jam, giving a 54.2 error. Top view of printer with the top door open B Inside view of printer A D C C D C D A 4. If the toner carousel becomes jammed, rotate the toner carousel manually Locate the carousel brake release A and press the metal tab with the end of a pen. For your safety avoid poking your finger into the brake release. With your other hand push the carousel around to the positions required to remove the cartridges. • Locate the brake release: Four plastic fingers extend down from the edge of the printer's top cover. The rightmost finger B is black and presses the brake release when the cover is closed. • Remove all toner cartridges and turn the printer's power off. Replace the toner cartridges as prompted by the printer's control panel: • Power the printer on then follow the prompts on the printer's control panel to reinsert the toner cartridges. Replace the toner cartridges manually as needed: • Position the carousel: Rotate the carousel until the the black channels C in both sides of the carousel are aligned with the light channels D in both sides of the printer. • Insert the toner cartridge then repeat the process with the other cartridges.
-
 1
1 -
 2
2 -
 3
3
 |
 |
