HP 5400C HP Scanjet 4400C/5400C Series Scanner Mac - (English) User Manual - Page 42
Cropping or selecting an area for final scan, Select All
 |
View all HP 5400C manuals
Add to My Manuals
Save this manual to your list of manuals |
Page 42 highlights
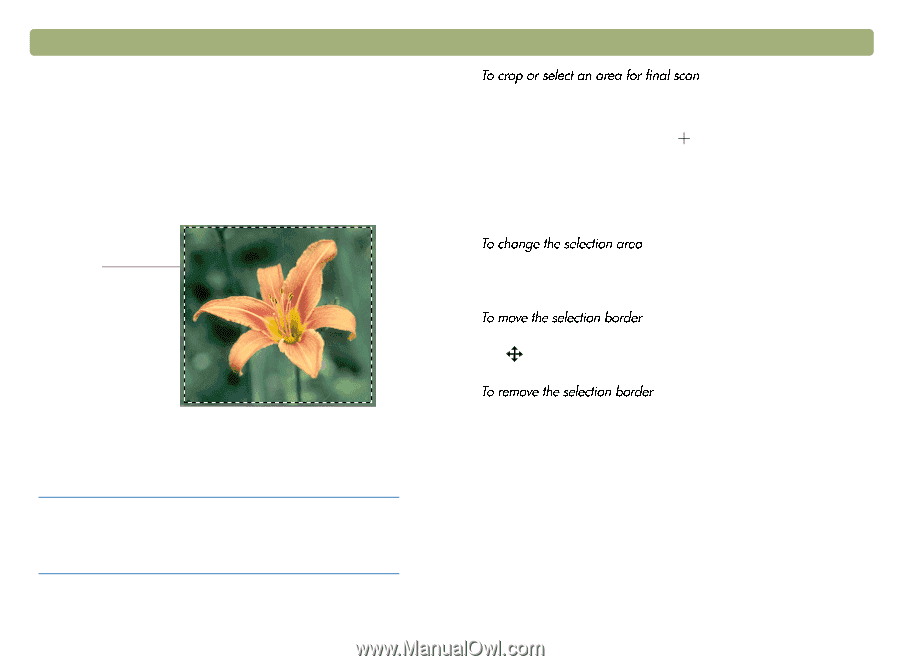
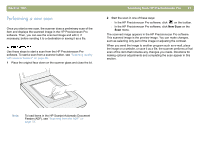
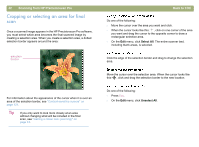
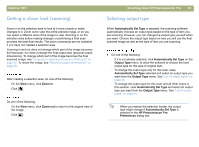
42 Scanning from HP Precisionscan Pro Cropping or selecting an area for final scan Once a scanned image appears in the HP Precisionscan Pro software, you must select which area becomes the final scanned image by creating a selection area. When you create a selection area, a dotted selection border appears around the area: selection border For information about the appearance of the cursor when it is over an area of the selection border, see "Context-sensitive cursors" on page 121. Tip If you only want to look more closely at an area without changing what will be included in the final scan, see "Getting a closer look (zooming)" on page 43. Back to TOC Do one of the following: l Move the cursor over the area you want and click. l When the cursor looks like this: , click on one corner of the area you want and drag the cursor to the opposite corner to draw a rectangular selection area. l On the Edit menu, click Select All. The entire scanner bed, including blank areas, is selected. Click the edge of the selection border and drag to change the selection area. Move the cursor over the selection area. When the cursor looks like this: , click and drag the selection border to the new location. Do one of the following: l Press ESC. l On the Edit menu, click Unselect All.
-
 1
1 -
2
-
3
-
4
-
5
-
6
-
7
-
8
-
9
-
10
-
11
-
12
-
13
-
14
-
15
-
16
-
17
-
18
-
19
-
20
-
21
-
22
-
23
-
24
-
25
-
26
-
27
-
28
-
29
-
30
-
31
-
32
-
33
-
34
-
35
-
36
-
 37
37 -
 38
38 -
 39
39 -
 40
40 -
 41
41 -
 42
42 -
 43
43 -
 44
44 -
 45
45 -
 46
46 -
 47
47 -
48
-
49
-
50
-
51
-
52
-
53
-
54
-
55
-
56
-
57
-
58
-
59
-
60
-
61
-
62
-
63
-
64
-
65
-
66
-
67
-
68
-
69
-
70
-
71
-
72
-
73
-
74
-
75
-
76
-
77
-
78
-
79
-
80
-
81
-
82
-
83
-
84
-
85
-
86
-
87
-
88
-
89
-
90
-
91
-
92
-
93
-
94
-
95
-
96
-
97
-
98
-
99
-
100
-
101
-
102
-
103
-
104
-
105
-
106
-
107
-
108
-
109
-
110
-
111
-
112
-
113
-
114
-
115
-
116
-
117
-
118
-
119
-
120
-
121
-
122
-
123
-
124
-
125
-
126
-
127
-
128
-
129
-
130
-
131
-
132
-
133
-
134
-
135
-
136
-
137
-
138
-
139
-
140
-
141
-
142
-
143
-
144
-
145
-
146
 |
 |