HP A6419fh Getting Started Guide - Page 206
Changing the TV recording path to the HP Media Drive, settings, Recorder, Recorder Storage
 |
UPC - 883585760572
View all HP A6419fh manuals
Add to My Manuals
Save this manual to your list of manuals |
Page 206 highlights
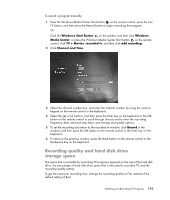
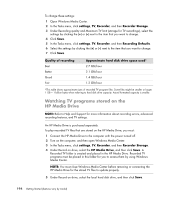
4 Before disconnecting the drive: Make sure that there are no scheduled recordings or recordings in progress, to avoid losing data. Change the recording path back to the local hard disk drive. See "Changing the TV recording path to the local hard disk drive." 5 Disconnect the HP Media Drive safely. See "Disconnecting the Drive." Changing the TV recording path to the HP Media Drive If you decide to change the recording path to record directly to the HP Media Drive, Windows Media Center creates a Recorded TV folder on the drive: 1 Assign a drive letter to the HP Media Drive. See "Locating the Drive and Assigning a Drive Letter." 2 Open Windows Media Center. 3 In the Tasks menu, click settings, TV, Recorder, and then Recorder Storage. 4 Under Record on Drive, select (+) to select the HP Media Drive. You can also set the disk allocation and recording quality settings in this window. NOTE: HP recommends that you: Record TV programs directly to the local hard disk drive and then transfer your recorded programs to the HP Media Drive, if you so desire. Know the drive letter assigned to and the storage amount of the HP Media Drive. 5 Click Save. To change the TV recording path back to the local hard disk drive, follow this procedure and select the hard disk drive in step 4 of the previous procedure. Changing the TV recording path to the local hard disk drive To change the Windows Media Center TV recording path to the local hard disk drive: 1 Open Windows Media Center. 2 In the Tasks menu, click settings, TV, Recorder, and then Recorder Storage. You can also set the disk allocation and recording quality settings in this window. 3 Select the local hard disk drive (C:). 4 Click Save. 196 Getting Started (features vary by model)
-
 1
1 -
2
-
3
-
4
-
5
-
6
-
7
-
8
-
9
-
10
-
11
-
12
-
13
-
14
-
15
-
16
-
17
-
18
-
19
-
20
-
21
-
22
-
23
-
24
-
25
-
26
-
27
-
28
-
29
-
30
-
31
-
32
-
33
-
34
-
35
-
36
-
37
-
38
-
39
-
40
-
41
-
42
-
43
-
44
-
45
-
46
-
47
-
48
-
49
-
50
-
51
-
52
-
53
-
54
-
55
-
56
-
57
-
58
-
59
-
60
-
61
-
62
-
63
-
64
-
65
-
66
-
67
-
68
-
69
-
70
-
71
-
72
-
73
-
74
-
75
-
76
-
77
-
78
-
79
-
80
-
81
-
82
-
83
-
84
-
85
-
86
-
87
-
88
-
89
-
90
-
91
-
92
-
93
-
94
-
95
-
96
-
97
-
98
-
99
-
100
-
101
-
102
-
103
-
104
-
105
-
106
-
107
-
108
-
109
-
110
-
111
-
112
-
113
-
114
-
115
-
116
-
117
-
118
-
119
-
120
-
121
-
122
-
123
-
124
-
125
-
126
-
127
-
128
-
129
-
130
-
131
-
132
-
133
-
134
-
135
-
136
-
137
-
138
-
139
-
140
-
141
-
142
-
143
-
144
-
145
-
146
-
147
-
148
-
149
-
150
-
151
-
152
-
153
-
154
-
155
-
156
-
157
-
158
-
159
-
160
-
161
-
162
-
163
-
164
-
165
-
166
-
167
-
168
-
169
-
170
-
171
-
172
-
173
-
174
-
175
-
176
-
177
-
178
-
179
-
180
-
181
-
182
-
183
-
184
-
185
-
186
-
187
-
188
-
189
-
190
-
191
-
192
-
193
-
194
-
195
-
196
-
197
-
198
-
199
-
200
-
 201
201 -
 202
202 -
 203
203 -
 204
204 -
 205
205 -
 206
206 -
 207
207 -
 208
208 -
 209
209 -
 210
210 -
 211
211 -
212
-
213
-
214
-
215
-
216
 |
 |