HP AB421A SCSI Hard Drives Preinstallation Instructions - Page 3
Completing the installation
 |
UPC - 882780213784
View all HP AB421A manuals
Add to My Manuals
Save this manual to your list of manuals |
Page 3 highlights
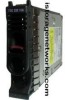
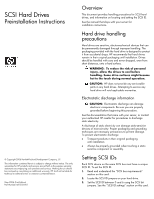
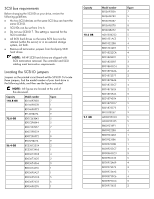
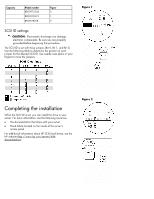
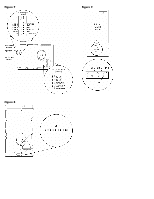
Capacity Model number BD00975334 BD00978274 BF0097B258 Figure 5 1 9 SCSI ID settings CAUTION: Electrostatic discharge can damage electronic components. Be sure you are properly grounded before beginning this procedure. The SCSI ID is set with three jumpers (Bit 0, Bit 1, and Bit 2). Use the following table to determine the position of each jumper for the desired SCSI ID. Use needle nose pliers or your fingers to move the jumpers. Figure 1 Completing the installation When the SCSI ID is set, you can install the drive in your server. For more information, see the following resources: • The documentation that ships with your server • Hood labels located on the inside of the server's access panel For additional information about HP SCSI hard drives, see the HP website (http://www.hp.com/servers/hdddocumentation). Figure 2
-
 1
1 -
 2
2 -
 3
3 -
 4
4 -
 5
5
 |
 |