HP BL2x220c Processor Option Installation Instructions for the HP ProLiant BL2 - Page 3
they do not become pinched when the server B assembly
 |
View all HP BL2x220c manuals
Add to My Manuals
Save this manual to your list of manuals |
Page 3 highlights
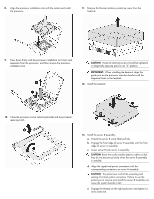
8. Align the processor installation tool with the socket and install the processor. 11. Remove the thermal interface protective cover from the heatsink. 9. Press down firmly until the processor installation tool clicks and separates from the processor, and then remove the processor installation tool. CAUTION: Heatsink retaining screws should be tightened in diagonally opposite pairs (in an "X" pattern). IMPORTANT: When installing the heatsink, align the guide pins on the processor retention bracket with the alignment holes in the heatsink. 12. Install the heatsink. 10. Close the processor socket retaining bracket and the processor retaining latch. 13. Install the server B assembly: a. Extend the server B serial label pull tab. b. Engage the front edge of server B assembly with the front edge of server A assembly. c. Lower server B onto server A assembly. CAUTION: Route the cache module battery cables so that they do not become pinched when the server B assembly is installed. d. Align the signal and power connectors with the corresponding connectors on server A assembly. CAUTION: The jackscrews control the unseating and seating of critical system connectors. Failure to use the jackscrews to remove and install the server B assembly can cause the system boards to fail. e. Engage the threads on the right jackscrew and tighten six turns clockwise.
-
 1
1 -
 2
2 -
 3
3 -
 4
4
 |
 |
