HP Blackbird 002-01A HP Blackbird Gaming System - Upgrading and Servicing - Page 10
three snaps located on each side of the middle of the inlay.
 |
View all HP Blackbird 002-01A manuals
Add to My Manuals
Save this manual to your list of manuals |
Page 10 highlights
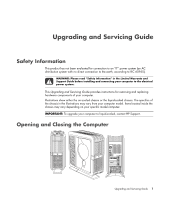
c On the outside of the door, do the following: CAUTION: To avoid damaging the inlay, do not pull out the inlay more than 2.54 cm (1 inch) away from the door. a Slowly pull out the square-cornered edge of the inlay (C, near the rear of the chassis) to free the three snaps along the left side of the inlay. b Continue to slowly pull out the edge of the inlay to free the two columns of three snaps located on each side of the middle of the inlay. c Holding the inlay near to the door, slide it toward the back of the chassis to free it. d Set the inlay aside. C To install the inlay, see "Replacing the access door" on page 8. 6 Upgrading and Servicing Guide
-
 1
1 -
2
-
3
-
4
-
 5
5 -
 6
6 -
 7
7 -
 8
8 -
 9
9 -
 10
10 -
 11
11 -
 12
12 -
 13
13 -
 14
14 -
 15
15 -
16
-
17
-
18
-
19
-
20
-
21
-
22
-
23
-
24
-
25
-
26
-
27
-
28
-
29
-
30
-
31
-
32
-
33
-
34
-
35
-
36
-
37
-
38
-
39
-
40
-
41
-
42
-
43
-
44
-
45
-
46
-
47
-
48
-
49
-
50
-
51
-
52
-
53
-
54
-
55
-
56
-
57
-
58
 |
 |

6
Upgrading and Servicing Guide
c
On the outside of the door, do the following:
a
Slowly pull out the square-cornered edge of the inlay (
C
, near the rear of the
chassis) to free the three snaps along the left side of the inlay.
b
Continue to slowly pull out the edge of the inlay to free the two columns of
three snaps located on each side of the middle of the inlay.
c
Holding the inlay near to the door, slide it toward the back of the chassis to
free it.
d
Set the inlay aside.
To install the inlay, see “Replacing the access door” on page 8.
CAUTION: To avoid damaging the inlay, do not pull out the inlay more than
2.54 cm (1 inch) away from the door.
C