HP Brio ba300 HP IDE Hard Disk Drive, installation guide - Page 10
Configuring Without Cable Select, Configuring Your New Hard Disk Drive, Configuring an Existing Hard
 |
View all HP Brio ba300 manuals
Add to My Manuals
Save this manual to your list of manuals |
Page 10 highlights
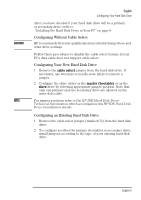
CAUTION NOTE English Configuring Your Hard Disk Drive After you have decided if your hard disk drive will be a primary or secondary drive, refer to "Installing the Hard Disk Drive in Your PC" on page 6. Configuring Without Cable Select HP recommends that only qualified persons should change these and other drive settings. Follow these procedures to disable the cable select feature if your PC's data cable does not support cable select: Configuring Your New Hard Disk Drive 1 Remove the cable select jumper from the hard disk drive. If necessary, use tweezers or needle-nose pliers to remove a jumper. 2 Configure the drive either as the master (bootable) or as the slave drive by selecting appropriate jumper position. Note that only one primary and one secondary drive are allowed on the same data cable. For jumper positions refer to the HP IDE Hard Disk Drive Technical Information which accompanies this HP IDE Hard Disk Drive Installation Guide. Configuring an Existing Hard Disk Drive 1 Remove the cable select jumper (marked CS) from the hard disk drive. 2 To configure as either the primary (bootable) or secondary drive, install jumpers according to the type of your existing hard disk drive. English 5
-
 1
1 -
2
-
3
-
4
-
 5
5 -
 6
6 -
 7
7 -
 8
8 -
 9
9 -
 10
10 -
 11
11 -
 12
12 -
 13
13 -
 14
14 -
 15
15 -
16
 |
 |