HP C7770B HP DesignJet 500Plus Printers - D/A1-size Stand and Paper Bin Setup - Page 1
HP C7770B - DesignJet 500 Color Inkjet Printer Manual
 |
UPC - 725184439704
View all HP C7770B manuals
Add to My Manuals
Save this manual to your list of manuals |
Page 1 highlights
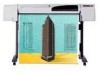
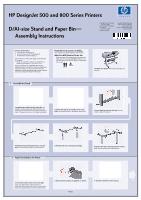
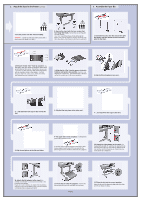
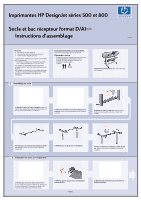
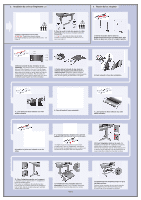
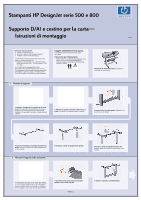
HP DesignJet 500 and 800 Series Printers D/A1-size Stand and Paper Bin- Assembly Instructions Copyright Hewlett-Packard Company 2000 Part Number C7769-90161 First Edition September 2000 Printed in Europe Hewlett-Packard Company Inkjet Commercial Division Avda. Graells, 501 08190 Sant Cugat del Vallès Barcelona, Spain Contents of This Poster 1. Assemble the Stand (page 1) 2. Attach the Stand to the Printer (page 2) 3. Assemble the Paper Bin (page 2) The information on this poster applies to the following HP products: • Stand and Paper Bin accessory for the D/A1-size models-part numbers C7781A and C7782A. If you are installing this accessory after the main installation has been completed, use these instructions. If you are installing it at the same time as the main installation, read the appropriate stages of the Assembly and Set-Up Instructions Poster for the printer. Read these instructions carefully... and complete each stage before you start the next. What You Will Need to Do the Job • Because some of the components of the printer are bulky, you will need 2 or 3 people to lift them. See the descriptions that follow for details-a symbol like this is used: The D/A1-size printer with its stand and paper bin attached. 1. Assemble the Stand 1-Separate the stand from the paper bin. Set aside the cardboard tray inside which separates the components of the paper bin from those of the printer's stand. This gives you access to the stand components. 2-Attach the legs to the outside of the cross brace. Note that the stand is assembled upside-down. 3-Insert eight screws into the legs. Use the smaller screws with washers. 4-Position the horizontal foot brace onto the feet. Push the foot brace into the slot in each foot. 2. Attach the Stand to the Printer 5-Position the feet on the legs assembly. 6-Secure the feet to the legs with ten screws. Again, use the smaller screws with washers. 1-Check that all the stand screws are tight. If you can't tighten all the screws properly, try unscrewing one or two so that the legs, feet and cross braces are properly aligned, and then retighten them. 2-Ensure all four brakes are applied, as shown. 3-Turn the stand the correct way up. Page 1
-
 1
1 -
 2
2 -
 3
3 -
 4
4 -
 5
5 -
 6
6 -
 7
7 -
8
-
9
-
10
-
11
-
12
 |
 |
