HP CM2320n HP Color LaserJet CM2320 MFP Series - Software Technical Reference - Page 162
Install printer-drivers by using a CD, Set a default printer
 |
UPC - 883585419951
View all HP CM2320n manuals
Add to My Manuals
Save this manual to your list of manuals |
Page 162 highlights
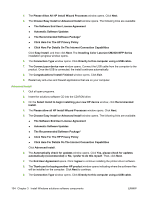
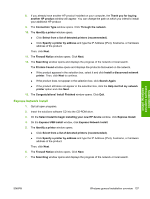
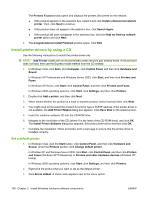
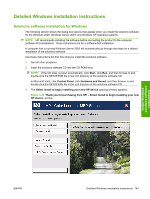
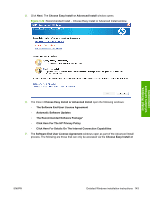
The Printers Found window opens and displays the printers discovered on the network. ● If the product appears in the selection box, select it and click Install a discovered network printer. Then, click Next to continue. ● If the product does not appear in the selection box, click Search Again. ● If the product still does not appear in the selection box, click the Help me find my network printer option and click Next. 8. The Congratulations! Install Finished window opens. Click Exit. Install printer-drivers by using a CD Use the following instructions to install the printer-driver only. NOTE: Add Printer installs are not recommended unless the print port already exists. If the print port does not exist, then use the Express Install method from the CD instead. 1. In Windows Vista, click Start, click Computer, click Control Panel, and then click Hardware and Sound. In Windows XP Professional and Windows Server 2003, click Start, and then click Printers and Faxes. In Windows XP Home, click Start, click Control Panel, and then click Printers and Faxes. In Windows 2000 operating systems, click Start, click Settings, and then click Printers. 2. Double-click Add a printer, and then click Next. 3. When asked whether the product is a local or network product, select local and then click Next. 4. You might need to first select the product for a list or type a TCP/IP address. If the printer-driver is not available, the Add Printer Wizard dialog box appears. Click Have Disk on the wizard screen. 5. Insert the solutions software CD into the CD-ROM drive. 6. Navigate to the root folder of the CD (where X is the letter of the CD-ROM drive), and click OK. The Install Printer Software dialog box appears. Select the printer-driver and then click OK. 7. Complete the installation. When prompted, print a test page to ensure that the printer-driver is installed correctly. Set a default printer 1. In Windows Vista, click the Start button, click Control Panel, and then click Hardware and Sound. Under the Printers section, click Change default printer. In Windows XP and Windows Server 2003, click Start, click Control Panel, and then click Printers and Faxes (Windows XP Professional) or Printers and other hardware devices (Windows XP Home). In Windows 2000 operating systems, click Start, click Settings, and then click Printers. 2. Right-click the product that you want to set as the default printer. 3. Click Set as default. A check mark appears next to the menu option. 138 Chapter 3 Install Windows solutions software components ENWW
-
 1
1 -
2
-
3
-
4
-
5
-
6
-
7
-
8
-
9
-
10
-
11
-
12
-
13
-
14
-
15
-
16
-
17
-
18
-
19
-
20
-
21
-
22
-
23
-
24
-
25
-
26
-
27
-
28
-
29
-
30
-
31
-
32
-
33
-
34
-
35
-
36
-
37
-
38
-
39
-
40
-
41
-
42
-
43
-
44
-
45
-
46
-
47
-
48
-
49
-
50
-
51
-
52
-
53
-
54
-
55
-
56
-
57
-
58
-
59
-
60
-
61
-
62
-
63
-
64
-
65
-
66
-
67
-
68
-
69
-
70
-
71
-
72
-
73
-
74
-
75
-
76
-
77
-
78
-
79
-
80
-
81
-
82
-
83
-
84
-
85
-
86
-
87
-
88
-
89
-
90
-
91
-
92
-
93
-
94
-
95
-
96
-
97
-
98
-
99
-
100
-
101
-
102
-
103
-
104
-
105
-
106
-
107
-
108
-
109
-
110
-
111
-
112
-
113
-
114
-
115
-
116
-
117
-
118
-
119
-
120
-
121
-
122
-
123
-
124
-
125
-
126
-
127
-
128
-
129
-
130
-
131
-
132
-
133
-
134
-
135
-
136
-
137
-
138
-
139
-
140
-
141
-
142
-
143
-
144
-
145
-
146
-
147
-
148
-
149
-
150
-
151
-
152
-
153
-
154
-
155
-
156
-
 157
157 -
 158
158 -
 159
159 -
 160
160 -
 161
161 -
 162
162 -
 163
163 -
 164
164 -
 165
165 -
 166
166 -
 167
167 -
168
-
169
-
170
-
171
-
172
-
173
-
174
-
175
-
176
-
177
-
178
-
179
-
180
-
181
-
182
-
183
-
184
-
185
-
186
-
187
-
188
-
189
-
190
-
191
-
192
-
193
-
194
-
195
-
196
-
197
-
198
-
199
-
200
-
201
-
202
-
203
-
204
-
205
-
206
-
207
-
208
-
209
-
210
-
211
-
212
-
213
-
214
-
215
-
216
-
217
-
218
-
219
-
220
-
221
-
222
-
223
-
224
-
225
-
226
-
227
-
228
-
229
-
230
-
231
-
232
-
233
-
234
-
235
-
236
-
237
-
238
-
239
-
240
-
241
-
242
-
243
-
244
-
245
-
246
-
247
-
248
-
249
-
250
-
251
-
252
-
253
-
254
-
255
-
256
-
257
-
258
-
259
-
260
-
261
-
262
-
263
-
264
-
265
-
266
-
267
-
268
-
269
-
270
-
271
-
272
-
273
-
274
-
275
-
276
-
277
-
278
-
279
-
280
-
281
-
282
-
283
-
284
-
285
-
286
-
287
-
288
-
289
-
290
-
291
-
292
-
293
-
294
-
295
-
296
-
297
-
298
-
299
-
300
-
301
-
302
-
303
-
304
-
305
-
306
-
307
-
308
-
309
-
310
-
311
-
312
 |
 |
