HP Color LaserJet CP1510 HP Color LaserJet CP1510 Series - User Guide - Page 101
Enable memory, Enable memory for Windows, Check DIMM installation, Clean the product, Upgrade firmware - driver download
 |
View all HP Color LaserJet CP1510 manuals
Add to My Manuals
Save this manual to your list of manuals |
Page 101 highlights
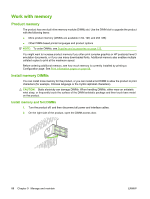
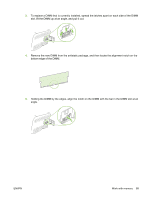
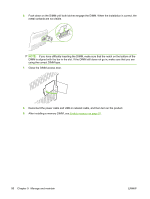
Enable memory If you installed a memory DIMM, set the printer driver to recognize the newly added memory. Enable memory for Windows 1. On the Start menu, point to Settings, and click Printers or Printers and Faxes. 2. Select this product and select Properties. 3. On the Configure tab, click More. 4. In the Total Memory field, type or select the total amount of memory that is now installed. 5. Click OK. Check DIMM installation Turn the product on. Check that the product is in the Ready state after it has gone through the startup sequence. If an error message appears, do the following: 1. Print a Configuration page. See Print information pages on page 68. 2. Check the Installed Personalities and Options section on the Configuration page and compare it with the Configuration page that you printed before the DIMM installation. 3. The DIMM might not be installed correctly. Repeat the installation procedure. -orThe DIMM may be defective. Try a new DIMM. Clean the product During the printing process, paper, toner, and dust particles can accumulate inside the product. Over time, this buildup can cause print-quality problems such as toner specks or smearing. This product has a cleaning mode that can correct and prevent these problems. 1. Open HP ToolboxFX. See View the HP ToolboxFX on page 69. 2. Click the Device Settings folder, and then click the Service page. 3. In the area for Cleaning Mode, click Start to begin the cleaning process. The product processes a single page, and then returns to the Ready state when the cleaning process is complete. Upgrade firmware To upgrade the product firmware, download the firmware update file from www.hp.com/go/ ljcp1510series_software and save the file to your network or personal computer. ENWW Clean the product 91
-
 1
1 -
2
-
3
-
4
-
5
-
6
-
7
-
8
-
9
-
10
-
11
-
12
-
13
-
14
-
15
-
16
-
17
-
18
-
19
-
20
-
21
-
22
-
23
-
24
-
25
-
26
-
27
-
28
-
29
-
30
-
31
-
32
-
33
-
34
-
35
-
36
-
37
-
38
-
39
-
40
-
41
-
42
-
43
-
44
-
45
-
46
-
47
-
48
-
49
-
50
-
51
-
52
-
53
-
54
-
55
-
56
-
57
-
58
-
59
-
60
-
61
-
62
-
63
-
64
-
65
-
66
-
67
-
68
-
69
-
70
-
71
-
72
-
73
-
74
-
75
-
76
-
77
-
78
-
79
-
80
-
81
-
82
-
83
-
84
-
85
-
86
-
87
-
88
-
89
-
90
-
91
-
92
-
93
-
94
-
95
-
 96
96 -
 97
97 -
 98
98 -
 99
99 -
 100
100 -
 101
101 -
 102
102 -
 103
103 -
 104
104 -
 105
105 -
 106
106 -
107
-
108
-
109
-
110
-
111
-
112
-
113
-
114
-
115
-
116
-
117
-
118
-
119
-
120
-
121
-
122
-
123
-
124
-
125
-
126
-
127
-
128
-
129
-
130
-
131
-
132
-
133
-
134
-
135
-
136
-
137
-
138
-
139
-
140
-
141
-
142
-
143
-
144
-
145
-
146
-
147
-
148
-
149
-
150
-
151
-
152
-
153
-
154
-
155
-
156
-
157
-
158
-
159
-
160
-
161
-
162
-
163
-
164
-
165
-
166
-
167
-
168
 |
 |
