HP Color LaserJet Enterprise MFP X57945dn User Guide - Page 103
Step three: Con the Quick Sets (optional), Enable Scan to USB Drive
 |
View all HP Color LaserJet Enterprise MFP X57945dn manuals
Add to My Manuals
Save this manual to your list of manuals |
Page 103 highlights
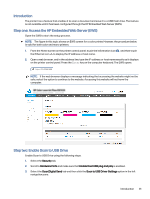
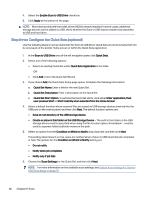
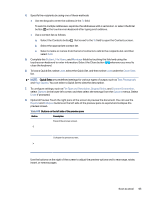
4. Select the Enable Scan to USB Drive check box. 5. Click Apply at the bottom of the page. NOTE: Most devices ship with hard disk drives (HDDs) already installed. In some cases, additional storage devices can be added via USB. Verify whether the Save to USB feature needs to be expanded to USB and hard drive. Step three: Configure the Quick Sets (optional) Use the following steps to set up Quick Sets for Scan to USB Drive. Quick Sets are shortcut jobs that can be accessed on the printer Home screen or within the Quick Sets application. 1. In the Scan to USB Drive area of the left navigation pane, click Quick Sets. 2. Select one of the following options: ● Select an existing Quick Set under Quick Sets Application in the table. -OR- ● Click Add to start the Quick Set Wizard. 3. If you clicked Add, the Quick Sets Setup page opens. Complete the following information: a. Quick Set Name: Enter a title for the new Quick Set. b. Quick Set Description: Enter a description of the Quick Set. c. Quick Set Start Option: To set how the Quick Set starts, click either Enter application, then user presses Start or Start instantly when selected from the Home Screen. 4. Select a default location where scanned files are saved on USB storage devices inserted into the USB port on the control panel, and then click Next. The default location options are: ● Save at root directory of the USB storage device. ● Create or place in this folder on the USB Storage Device - The path to the folder on the USB storage device must be specified when using this file location option. A backslash \ must be used to separate folder\subfolder names in the path. 5. Select an option from the Condition on Which to Notify: drop-down list, and then click Next. This setting determines if, or how, users are notified when a Save To USB Quick Set job completes or fails. The options for the Condition on Which to Notify: setting are: ● Do not notify ● Notify when job completes ● Notify only if job fails 6. Choose the Scan Settings for the Quick Set, and then click Next. NOTE: For more information on the available scan settings, see Default scan settings for Scan to USB Drive setup on page 93 92 Chapter 6 Scan
-
 1
1 -
2
-
3
-
4
-
5
-
6
-
7
-
8
-
9
-
10
-
11
-
12
-
13
-
14
-
15
-
16
-
17
-
18
-
19
-
20
-
21
-
22
-
23
-
24
-
25
-
26
-
27
-
28
-
29
-
30
-
31
-
32
-
33
-
34
-
35
-
36
-
37
-
38
-
39
-
40
-
41
-
42
-
43
-
44
-
45
-
46
-
47
-
48
-
49
-
50
-
51
-
52
-
53
-
54
-
55
-
56
-
57
-
58
-
59
-
60
-
61
-
62
-
63
-
64
-
65
-
66
-
67
-
68
-
69
-
70
-
71
-
72
-
73
-
74
-
75
-
76
-
77
-
78
-
79
-
80
-
81
-
82
-
83
-
84
-
85
-
86
-
87
-
88
-
89
-
90
-
91
-
92
-
93
-
94
-
95
-
96
-
97
-
 98
98 -
 99
99 -
 100
100 -
 101
101 -
 102
102 -
 103
103 -
 104
104 -
 105
105 -
 106
106 -
 107
107 -
 108
108 -
109
-
110
-
111
-
112
-
113
-
114
-
115
-
116
-
117
-
118
-
119
-
120
-
121
-
122
-
123
-
124
-
125
-
126
-
127
-
128
-
129
-
130
-
131
-
132
-
133
-
134
-
135
-
136
-
137
-
138
-
139
-
140
-
141
-
142
-
143
-
144
-
145
-
146
-
147
-
148
-
149
-
150
-
151
-
152
-
153
-
154
-
155
-
156
-
157
-
158
-
159
-
160
-
161
-
162
-
163
-
164
-
165
-
166
-
167
-
168
-
169
-
170
-
171
-
172
-
173
-
174
-
175
-
176
-
177
-
178
-
179
-
180
-
181
-
182
-
183
-
184
-
185
-
186
-
187
-
188
-
189
-
190
-
191
-
192
-
193
-
194
-
195
-
196
-
197
-
198
-
199
-
200
-
201
-
202
-
203
-
204
-
205
-
206
-
207
-
208
-
209
-
210
-
211
-
212
-
213
-
214
-
215
-
216
-
217
-
218
-
219
-
220
-
221
-
222
-
223
-
224
-
225
-
226
-
227
-
228
-
229
-
230
-
231
-
232
-
233
-
234
-
235
-
236
-
237
-
238
-
239
-
240
-
241
-
242
-
243
-
244
-
245
-
246
-
247
-
248
-
249
-
250
-
251
-
252
-
253
-
254
-
255
-
256
-
257
-
258
-
259
-
260
-
261
-
262
-
263
-
264
-
265
-
266
-
267
-
268
-
269
-
270
-
271
 |
 |