HP D5460 User Guide - Page 103
Solution, Print, Cause, offline, printing, To check the printer driver status, Settings, Status - printer drivers
 |
UPC - 883585857739
View all HP D5460 manuals
Add to My Manuals
Save this manual to your list of manuals |
Page 103 highlights
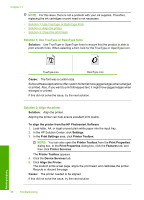
Chapter 11 Solution 3: Select the correct printer Solution: Make sure you have selected the correct printer in your software application. TIP: You can set the product as the default printer to ensure that the printer is automatically selected when you select Print in the File menu of your different software applications. Cause: The product was not the selected printer. If this did not solve the issue, try the next solution. Solution 4: Check the printer driver status Solution: The printer driver status might have changed to either offline or stop printing. To check the printer driver status 1. In the HP Solution Center, click the Settings tab. 2. Click Status. If the status is Offline or Stop printing, change the status to Ready. Cause: The status of the printer driver had changed. If this did not solve the issue, try the next solution. Solution 5: Wait until the product completes the current operation Solution: If the product is performing another task such as printing a photo or performing printer maintenance, your print job will be delayed until the product completes the current task. Some documents take a long time to print. If nothing has printed several minutes after you sent a print job to the product, check the product display to see if there are any messages. Cause: The product was busy with another task. If this did not solve the issue, try the next solution. Solution 6: Remove all cancelled print jobs from the queue Solution: A print job might remain in the queue after it has been cancelled. The cancelled print job jams the queue and prevents the next print job from printing. From your computer, open the printer folder and see if the cancelled job remains in the print queue. Try to delete the job from the queue. If the print job remains in the queue, try one or both of the following: • Disconnect the USB cable from the product, restart the computer, and then reconnect the USB cable to the product. • Shut down the product, restart the computer, and then restart the product. 102 Troubleshooting Troubleshooting
-
 1
1 -
2
-
3
-
4
-
5
-
6
-
7
-
8
-
9
-
10
-
11
-
12
-
13
-
14
-
15
-
16
-
17
-
18
-
19
-
20
-
21
-
22
-
23
-
24
-
25
-
26
-
27
-
28
-
29
-
30
-
31
-
32
-
33
-
34
-
35
-
36
-
37
-
38
-
39
-
40
-
41
-
42
-
43
-
44
-
45
-
46
-
47
-
48
-
49
-
50
-
51
-
52
-
53
-
54
-
55
-
56
-
57
-
58
-
59
-
60
-
61
-
62
-
63
-
64
-
65
-
66
-
67
-
68
-
69
-
70
-
71
-
72
-
73
-
74
-
75
-
76
-
77
-
78
-
79
-
80
-
81
-
82
-
83
-
84
-
85
-
86
-
87
-
88
-
89
-
90
-
91
-
92
-
93
-
94
-
95
-
96
-
97
-
 98
98 -
 99
99 -
 100
100 -
 101
101 -
 102
102 -
 103
103 -
 104
104 -
 105
105 -
 106
106 -
 107
107 -
 108
108 -
109
-
110
-
111
-
112
-
113
-
114
-
115
-
116
-
117
-
118
-
119
-
120
-
121
-
122
-
123
-
124
-
125
-
126
-
127
-
128
-
129
-
130
-
131
-
132
-
133
-
134
-
135
-
136
-
137
-
138
-
139
-
140
-
141
-
142
-
143
-
144
-
145
-
146
-
147
-
148
-
149
-
150
-
151
-
152
-
153
-
154
-
155
-
156
-
157
-
158
-
159
-
160
-
161
-
162
-
163
-
164
-
165
-
166
-
167
-
168
-
169
-
170
-
171
-
172
-
173
-
174
-
175
-
176
-
177
-
178
-
179
-
180
-
181
-
182
-
183
-
184
-
185
-
186
-
187
-
188
-
189
-
190
-
191
-
192
-
193
-
194
-
195
-
196
-
197
-
198
-
199
-
200
-
201
-
202
-
203
-
204
-
205
-
206
-
207
-
208
-
209
-
210
-
211
-
212
-
213
-
214
-
215
-
216
-
217
-
218
-
219
-
220
-
221
 |
 |
