HP DesignJet Z6 Security Features - Page 34
Folder name
 |
View all HP DesignJet Z6 manuals
Add to My Manuals
Save this manual to your list of manuals |
Page 34 highlights
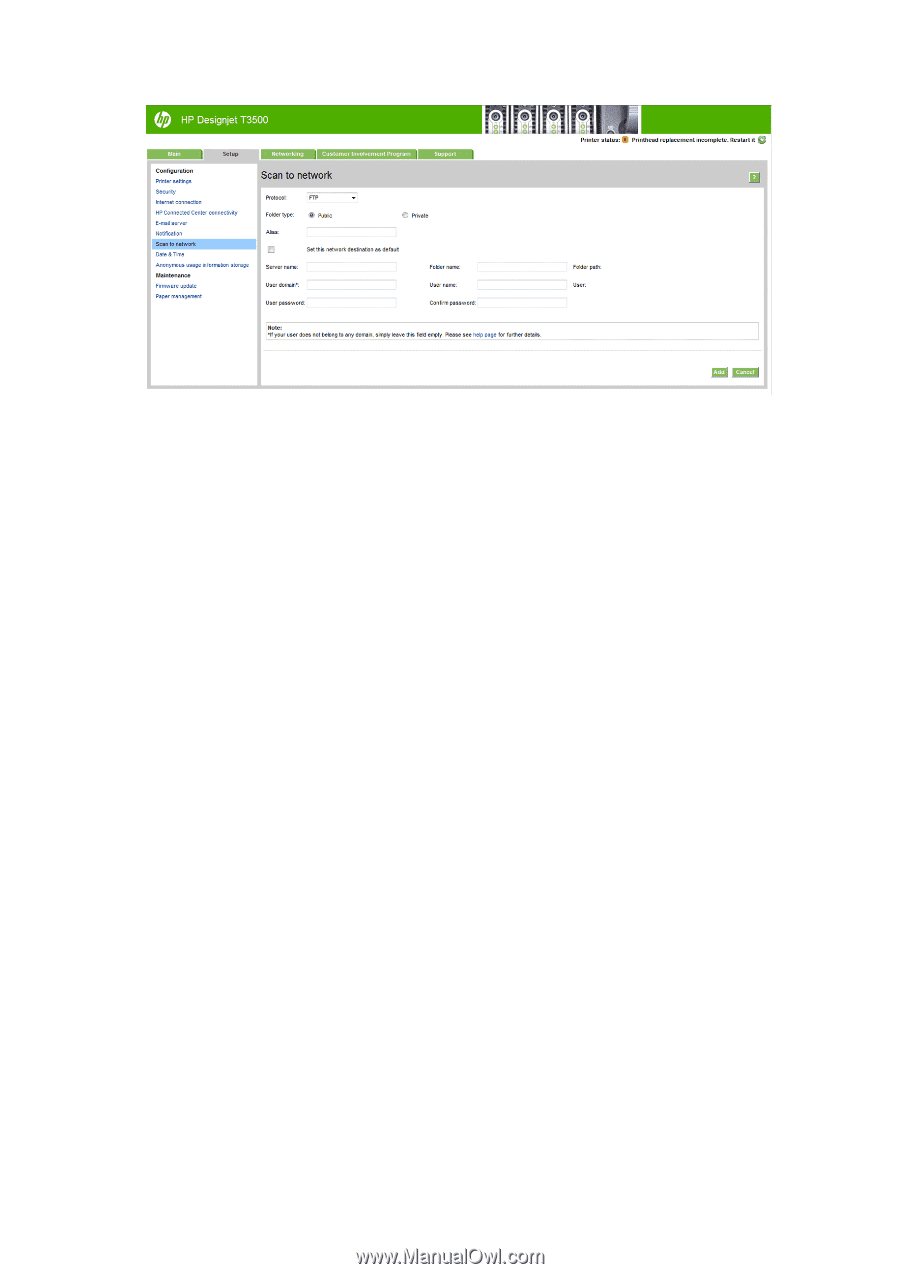
HP DesignJet Printers Security Settings • Protocol may be FTP or CIFS (Windows). • Folder type may be public or private. The folder type is displayed in both the Embedded Web Server and the front panel with an icon. When you select a private folder, you must enter a password in the front panel. • Alias name is displayed in the front panel when you are choosing the scan destination. It may be different from the network or FTP folder name. • Set this network destination as a default. If you have installed HP DesignJet SmartStream, the option to set it as a destination appears. For more information, see HP SmartStream user guide. • Server name should contain the network name of the remote computer. • Folder name should contain the share name of the folder. • User name should contain the name of the scanner user. • User password should contain the password of the scanner user. • Domain name should contain the name of the domain in which the user name exists. If the scanner user does not belong to any domain, leave this field empty. The server and folder names are used to connect to the shared folder by building a network folder path as follows: \\server name\folder name. For a network folder, enter the name or IP address of the remote computer, the name of the shared folder, and the user name and password of the scanner user that you have already created on the remote computer. Leave the user domain field empty unless the user is a member of a Windows domain. If the user is only a local user of the remote computer, leave the field empty. You can use the name (instead of the IP address) in the server name field only if the shared folder is on a Windows computer in the same local network. This must be a simple name (up to 16 characters long) without a domain suffix (without any dots in the name). Fully qualified DNS domain names are also supported. For an FTP folder, enter the server name, folder name, user name, and password. Leave the user domain empty. 5. Click Add to save the configuration. Note: If the product has already been configured for scanning to the network and you now want to use a different shared folder, click Modify. 6. The printer automatically checks that it can access the network folder. If not, see the User Guide of the printer. 34
-
 1
1 -
2
-
3
-
4
-
5
-
6
-
7
-
8
-
9
-
10
-
11
-
12
-
13
-
14
-
15
-
16
-
17
-
18
-
19
-
20
-
21
-
22
-
23
-
24
-
25
-
26
-
27
-
28
-
 29
29 -
 30
30 -
 31
31 -
 32
32 -
 33
33 -
 34
34 -
 35
35 -
 36
36 -
 37
37 -
 38
38 -
 39
39 -
40
-
41
-
42
-
43
-
44
-
45
-
46
-
47
-
48
-
49
-
50
-
51
-
52
-
53
-
54
-
55
-
56
-
57
-
58
-
59
-
60
-
61
-
62
-
63
-
64
-
65
-
66
-
67
-
68
-
69
-
70
-
71
-
72
-
73
-
74
-
75
-
76
-
77
-
78
-
79
-
80
 |
 |