HP Designjet Z5200 HP Designjet Z5200ps Printer - Introductory Information - Page 7
When the roll is aligned, the front panel displays the 'Ready' message and the printer is ready - inks
 |
View all HP Designjet Z5200 manuals
Add to My Manuals
Save this manual to your list of manuals |
Page 7 highlights
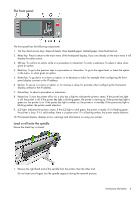
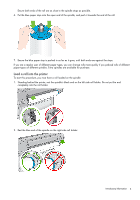
6. Roll the spindle into the feeder until you feel resistance. The printer detects the paper and feeds it automatically into the printer. 7. Once the paper is fed into the printer, the front-panel display asks whether you are loading a roll or a sheet. Select Roll with the Up and Down keys and press OK. 8. Select your paper category and type. 9. The printer checks the alignment and measures the width. 10. The front panel may ask whether you would like to cut a strip off the leading edge of the paper; reply Yes or No. 11. Check whether there are any further messages on the front panel. 12. When the roll is aligned, the front panel displays the 'Ready' message and the printer is ready to print. If the roll is not aligned, follow the instructions on the front-panel display. 13. If the paper is loose on the roll, lightly rewind from the end of the spindle until tight. When prints fall into the basket, they can be torn or marked by ink from other prints. To avoid this, catch your prints as they are cut from the roll and do not stack prints in the basket. Alternatively, turn off the automatic cutter, and use the Form feed and cut key to release your print. Introductory Information 6
-
 1
1 -
 2
2 -
 3
3 -
 4
4 -
 5
5 -
 6
6 -
 7
7 -
 8
8 -
 9
9 -
 10
10 -
 11
11 -
 12
12 -
13
-
14
-
15
-
16
-
17
-
18
-
19
-
20
-
21
-
22
-
23
-
24
-
25
-
26
-
27
-
28
-
29
-
30
-
31
-
32
-
33
-
34
-
35
-
36
-
37
-
38
-
39
-
40
-
41
-
42
-
43
-
44
-
45
-
46
-
47
-
48
-
49
-
50
-
51
-
52
-
53
-
54
-
55
-
56
-
57
-
58
-
59
-
60
-
61
-
62
-
63
-
64
-
65
-
66
-
67
-
68
-
69
-
70
-
71
-
72
-
73
-
74
-
75
-
76
-
77
-
78
-
79
-
80
-
81
-
82
-
83
-
84
-
85
-
86
-
87
-
88
-
89
-
90
-
91
-
92
-
93
-
94
-
95
-
96
-
97
-
98
-
99
-
100
-
101
-
102
-
103
-
104
-
105
-
106
-
107
-
108
-
109
-
110
-
111
-
112
-
113
-
114
-
115
-
116
-
117
-
118
-
119
-
120
-
121
-
122
-
123
-
124
-
125
-
126
-
127
-
128
-
129
-
130
-
131
-
132
-
133
-
134
-
135
-
136
-
137
-
138
-
139
-
140
-
141
-
142
-
143
-
144
-
145
-
146
-
147
-
148
-
149
-
150
-
151
-
152
-
153
-
154
-
155
-
156
-
157
-
158
-
159
-
160
-
161
-
162
-
163
-
164
-
165
-
166
-
167
-
168
-
169
-
170
-
171
-
172
-
173
-
174
-
175
-
176
-
177
-
178
-
179
-
180
 |
 |
