HP DeskJet Ink Advantage Ultra 4720 User Guide - Page 59
Scan using Webscan, Settings, Security, Administrator Settings, Webscan, Apply, Start Scan
 |
View all HP DeskJet Ink Advantage Ultra 4720 manuals
Add to My Manuals
Save this manual to your list of manuals |
Page 59 highlights
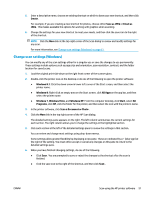
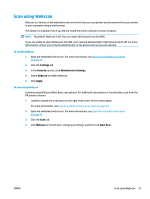
Scan using Webscan Webscan is a feature of the embedded web server that lets you scan photos and documents from your printer to your computer using a web browser. This feature is available even if you did not install the printer software on your computer. NOTE: By default, Webscan is off. You can enable this feature from the EWS. If you are unable to open Webscan in the EWS, your network administrator might have turned it off. For more information, contact your network administrator or the person who set up your network. To enable Webscan 1. Open the embedded web server. For more information, see Open the embedded web server on page 75. 2. Click the Settings tab. 3. In the Security section, click Administrator Settings. 4. Select Webscan to enable Webscan. 5. Click Apply. To scan using Webscan Scanning using Webscan offers basic scan options. For additional scan options or functionality, scan from the HP printer software. 1. Load the original print side down on the right front corner of the scanner glass. For more information, see Load an original on the scanner glass on page 20. 2. Open the embedded web server. For more information, see Open the embedded web server on page 75. 3. Click the Scan tab. 4. Click Webscan in the left pane, change any settings, and then click Start Scan . ENWW Scan using Webscan 53
-
 1
1 -
2
-
3
-
4
-
5
-
6
-
7
-
8
-
9
-
10
-
11
-
12
-
13
-
14
-
15
-
16
-
17
-
18
-
19
-
20
-
21
-
22
-
23
-
24
-
25
-
26
-
27
-
28
-
29
-
30
-
31
-
32
-
33
-
34
-
35
-
36
-
37
-
38
-
39
-
40
-
41
-
42
-
43
-
44
-
45
-
46
-
47
-
48
-
49
-
50
-
51
-
52
-
53
-
 54
54 -
 55
55 -
 56
56 -
 57
57 -
 58
58 -
 59
59 -
 60
60 -
 61
61 -
 62
62 -
 63
63 -
 64
64 -
65
-
66
-
67
-
68
-
69
-
70
-
71
-
72
-
73
-
74
-
75
-
76
-
77
-
78
-
79
-
80
-
81
-
82
-
83
-
84
-
85
-
86
-
87
-
88
-
89
-
90
-
91
-
92
-
93
-
94
-
95
-
96
-
97
-
98
-
99
-
100
-
101
-
102
-
103
-
104
-
105
-
106
-
107
-
108
-
109
-
110
-
111
-
112
-
113
-
114
-
115
-
116
-
117
-
118
-
119
-
120
-
121
-
122
-
123
-
124
-
125
-
126
-
127
-
128
-
129
-
130
 |
 |