HP Dx5150 HP dx5150 Series Personal Computers Service Reference Card (1st Edit - Page 1
HP Dx5150 - Compaq Business Desktop Manual
 |
UPC - 882780485433
View all HP Dx5150 manuals
Add to My Manuals
Save this manual to your list of manuals |
Page 1 highlights
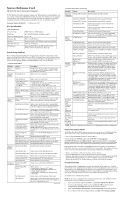
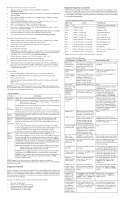
Service Reference Card HP dx5150 Series Personal Computers © 2005 Hewlett-Packard Development Company, L.P. The information contained herein is sub- ject to change without notice. HP shall not be liable for technical or editorial errors or omissions contained herein. Intel, Pentium, Intel Inside, and the Intel logo are trademarks or registered trademarks of the Intel Corporation and its subsidiaries in the U. S. and other countries. Document Number 381052-001. 1st Edition May 2005 Key Specifications Key Specifications Processor Type: AMD Athlon 64, AMD Sempron RAM Type: PC3200 DDR-SDRAM, 400 MHz, non-ECC Maximum RAM Supported: Up to 4 GB Expansion Bus: PCI 2.3 and PCI Express Graphics: Integrated graphics & PCI Express expansion capability Hard Drive Interface: SATA (up to 7200 rpm) I/O Interfaces: Serial, parallel, USB 2.0 (8), PS/2 (2), RJ-45, VGA, DVI-D, Audio-In, Audio-Out (2), Mic In (2) System Setup and Boot Basic system information regarding file, storage, security, and power configuration is maintained in the Setup Utility held in the system ROM. The Setup Utility is accessed by pressing the F10 key during the boot sequence. If you do not press the F10 key at the appropriate time, you must restart the computer and press and hold the F10 key again to access the utility. Computer Setup Menu Heading Option Description System Displays Information Product Name, Processor Type, Cache Size, Memory Size, System ROM, Integrated MAC, UUID, System Serial #, Asset Tag. Standard CMOS Features Date (mm:dd:yy) Allows you to set system date. Time (hh:mm:ss) Allows you to set system time. • PATA IDE Channel 0 Master & Slave • SATA IDE Channel 1 & 2 Master For each, allows you to: • enable/disable auto detection of HDD size & head. • set IDE to: None; Auto, Manual. • set access mode to: CHS, LBA, Large, Auto. Drive A Allows you to set Drive A to Disabled or Auto. Floppy 3 Mode Support Disables/sets diskette drive support to Drive A. Halt On Allows you to set at: All Errors, No Errors, All but Keyboard, All but Diskette, All but Diskette/Keybd. POST Delay Allows you to set a POST delay. Advanced BIOS Features Removable Device Boot Allows you to specify the order in which attached Priority devices are checked for a bootable OS image. Hard Disk Boot Priority Allows you to specify the order of attached hard drive devices. The first drive in the order has priority in the boot sequence and is recognized as drive C. CD-ROM Boot Priority Allows you to specify the order in which attached CD-ROM drives (including USB ODD) are checked for a bootable operating system image. Network Boot Priority Allows you to specify the order in which network devices (including UP NIC cards) are checked for a bootable operating system image. Quick Power On Self Test Enables/disables the system to skip certain tests while booting. Enabling this feature decreases the time required to boot the system. • First Boot Device • Second Boot Device • Third Boot Device • Fourth Boot Device Allows you to specify which devices will boot first, second, third, and fourth. NOTE: MS-DOS drive lettering assignments may not apply after a non-MS-DOS operating system has started. Boot Up NumLock Status Allows you to set the default NumLock status on or off. APIC Function Enables/disables the APIC support. MPS Version Ctrl for OS Allows you to set the MPS version for the OS. HDD SMART Function Enables/disables SMART capability on the HDD. BIOS Write Protection Enables/disables BIOS write protection. Advanced Chipset Features Internal Video Mode Disables/selects internal video mode. AGP Aperture Size Allows you to set the AGP aperture size. UMA Frame Buffer Size Allows you to set the size of UMA frame buffer. Video Display Devices Allows you to select the video display devices. Auto Detect PCI Clk Enables/disables PCI Clk auto detection. Spread Spectrum Enables/disables spread spectrum. Integrated South OnChip IDE Peripherals Device Allows you to enable/disable IDE devices. South OnChip PCI Device Allows you to: • enable/disable: Onboard AC97 Audio. • select: SATA Disabled, IDE Controller (non- RAID), RAID Controller. • enable/disable: Onboard LAN, Onboard LAN Boot ROM. Init Display First Allows you to select the primary VGA source. Surroundview Allows you to enable/disable Surroundview only if PCI-E GFX add-on card is ATI. Provides support for up to three independent monitors. Continued Computer Setup Menu (Continued) Heading Option Description Integrated OnChip USB Controller Enables/disables the USB controller. Peripherals (continued) Front Panel USB Port Enables/disables the front panel USB ports. Onboard FDC Cntroller Enables/disables onboard FDC controller. Onboard Serial Port Allows you to disable or select setting for the onboard serial port. Onboard Parallel Port Allows you to disable or select setting for the onboard parallel port. Parallel Port Mode Allows you to select parallel port mode. ECP Mode Use DMA If Parallel Port Mode is set to ECP or ECP+EPP, allows you to set the ECP Mode Use DMA to 1 or 3. Power ACPI Function Manage- ment Setup Enables/disables ACPI functions. ACPI Suspend Type Allows you to set type of ACPI suspend. After AC Power Loss Allows you to select: Last State, On, Off. PowerOn by PCI Card Enables/disables ability to power on by PCI card. AMD Cool'n'Quiet Allows you to set the AMD Cool'n'Quiet to auto or to disable it. RTC Alarm Resume Enables/disables resumption of RTC alarm. Date (of Month) If RTC Alarm Resume enabled, allows you to select the day of the month for resumption of RTC alarm. Resume Time (hh:mm:ss) If RTC Alarm Resume is enabled, allows you to select what time the RTC alarm will resume. PnP/PCI Reset Configurations Configura- Data tion Enables/disables automatic reconfiguration. Default is Disabled. Select Enabled to reset Extended System Configuration Data (ESCD) when you exit Setup, if you have installed a new add-on and the system reconfiguration has caused such a serious conflict that the OS cannot boot. Resources Controlled By Allows you to select whether resources are controlled automatically or manually. BIOS can automatically configure all the boot and Plug-and-Playcompatible devices. If you choose Auto, you cannot select IRQ DMA and memory base address fields, since BIOS automatically assigns them. IRQ Resource: IRQ-3, 4, 5, 7, 10, 11, 12, 14, 15 assigned to When resources are controlled manually, allows you to assign each system interrupt a type, depending on the type of device using the interrupt. Legacy ISA for devices compliant with the original PC AT bus specification, PCI/ISA PnP for devices compliant with the Plug and Play standard whether designed for PCI or ISA bus architecture. PCI/VGA Palette Snoop Enables/disables PCI/VGA palette snoop. Assign IRQ for VGA Enables/disables ability to assign IRQ for VGA. Assign IRQ for USB Enables/disables ability to assign IRQ for USB. PC Health System Information Status Lists: CPU Temperature, System Temperature, CPU Fan Speed, System Fan Speed. Load Optimized Defaults Allows you to reset Computer Setup to factory defaults. Set Supervisor Password Allows you to establish a password to control access to Computer Setup. Set User Password Allows you to establish a password to control access to the computer. Save & Exit Setup Allows you to save current settings and exit Computer Setup. Exit Without Saving Allows you to exit Computer Setup without saving changes. NOTE: Support for Computer Setup options may vary depending on hardware configuration. FailSafe Boot Block ROM The FailSafe Boot Block ROM allows for system recovery in the event of a ROM flash failure. The computer comes with a reprogrammable flash system ROM. To upgrade the ROM: - Order an upgraded ROMPaq diskette or CD from HP, or - Download the latest ROMPaq images from the HP Web site (www.hp.com). All ROMPaq ROM images from HP are digitally signed to ensure authenticity and minimize potential corruption. Your system ROM includes a Failsafe Boot Block that is protected during the flash process and allows the computer to be restarted during an unsuccessful ROM flash. If the computer detects an invalid system ROM during the boot sequence, the System Power LED blinks red 8 times, 1 every second, followed by a 2 second pause. The computer also beeps 8 times. To recover from the Boot Block recovery mode complete the following steps: 1. Remove any diskettes or CDs from the drives and turn off power. 2. Insert a ROMPaq diskette or CD into the drive and turn on the computer. 3. Enter the supervisor password. If the computer successfully starts and reprograms the ROM, the three keyboard lights will turn on, and you will hear a rising tone series of beeps. 4. Remove the diskette or CD, and then turn power off and on to restart the computer. Security Functions The computer offers two independent passwords for computer and data protection. The User password protects the computer from unauthorized access by prompting the user for a password during power up. The Supervisor password protects the computer from unauthorized or inadvertent reconfiguration by prompting the user for a password prior to entering Computer Setup, You can also use the Supervisor password as an override to the User password. To establish a User or Supervisor password: NOTE: If the system is equipped with an embedded security device, refer to HP ProtectTools Embedded Security Guide on the Documentation CD. 1. Turn on or restart the computer. In Windows, click Start > Shut Down > Restart. 2. As soon as the computer is turned on, press and hold the F10 key until you enter Computer Setup. Press Enter to bypass the title screen, if necessary. 3. Select either Set Supervisor Password or Set User Password and enter the password. 4. To save the password and exit Computer Setup, click File > Save Changes and Exit.
-
 1
1 -
 2
2
 |
 |