HP ENVY 17-n000 Maintenance and Service Guide 1 - Page 49
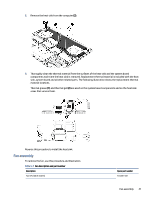
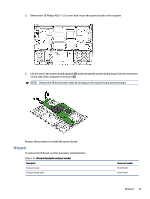
Disconnect the display panel cable, and then lift the cables from the right fan's retention clips
 |
View all HP ENVY 17-n000 manuals
Add to My Manuals
Save this manual to your list of manuals |
Page 49 highlights
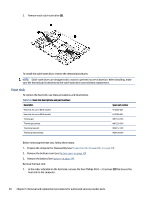
Table 5-7 Fan description and part number (continued) Description Fan GPU (60 W models) Fan CPU (80 W models) Fan GPU (80 W models) Spare part number N13388-001 N14836-001 N14837-001 Before removing the fan, follow these steps: 1. Prepare the computer for disassembly (see Preparation for disassembly on page 33). 2. Remove the bottom cover (see Bottom cover on page 33). 3. Remove the battery (see Battery on page 34). 4. Remove the heat sink (see Heat sink on page 40). Remove the fan assembly: 1. Disconnect the power connector cable from the system board (1). 2. Remove the shield that secures the wireless antenna module (2) to the WLAN module terminals, and then disconnect the wireless antenna cables from the WLAN module terminals (3). NOTE: The #1/white wireless antenna cable connects to the WLAN module #1/Main terminal. The #2/ black wireless antenna cable connects to the WLAN module #2/Aux terminal. 3. Disconnect the display panel cable (4), and then lift the cables from the right fan's retention clips (5). 4. Disconnect the left and right fan cables from the system board (6). 5. Remove the three Phillips M2.0 × 3.5 screws (7) that secure the left fan to the computer, and then remove the three Phillips M2.0 × 3.5 screws from the right fan (8). 6. Remove both fans from the computer (9). Reverse this procedure to install the fan assembly. 42 Chapter 5 Removal and replacement procedures for authorized service provider parts
-
 1
1 -
2
-
3
-
4
-
5
-
6
-
7
-
8
-
9
-
10
-
11
-
12
-
13
-
14
-
15
-
16
-
17
-
18
-
19
-
20
-
21
-
22
-
23
-
24
-
25
-
26
-
27
-
28
-
29
-
30
-
31
-
32
-
33
-
34
-
35
-
36
-
37
-
38
-
39
-
40
-
41
-
42
-
43
-
 44
44 -
 45
45 -
 46
46 -
 47
47 -
 48
48 -
 49
49 -
 50
50 -
 51
51 -
 52
52 -
 53
53 -
 54
54 -
55
-
56
-
57
-
58
-
59
-
60
-
61
-
62
-
63
-
64
-
65
-
66
-
67
-
68
-
69
-
70
-
71
-
72
-
73
-
74
-
75
-
76
-
77
-
78
-
79
-
80
-
81
-
82
-
83
-
84
-
85
-
86
-
87
-
88
-
89
-
90
 |
 |