HP ENVY 750-400 Optical Drive Replacement Instructions - Page 2
Replacing the optical drive
 |
View all HP ENVY 750-400 manuals
Add to My Manuals
Save this manual to your list of manuals |
Page 2 highlights
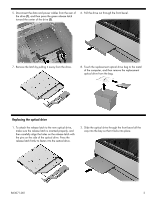
5. Disconnect the data and power cables from the rear of the drive (1), and then press the green release latch toward the center of the drive (2). 6. Pull the drive out through the front bezel. 7. Remove the latch by pulling it away from the drive. 8. Touch the replacement optical drive bag to the metal of the computer, and then remove the replacement optical drive from the bag. Replacing the optical drive 1. To attach the release latch to the new optical drive, make sure the release latch is oriented properly, and then carefully align the holes on the release latch with the pins on the side of the optical drive. Press the release latch firmly to fasten it to the optical drive. 2. Slide the optical drive through the front bezel all the way into the bay so that it locks into place. 863071-001 2
-
 1
1 -
 2
2 -
 3
3
 |
 |
