HP ENVY TouchSmart 17-j100 HP ENVY 17 Notebook PC HP ENVY TouchSmart m7 Notebo - Page 92
Disconnect the power from the computer by first unplugging the power cord from the AC outlet
 |
View all HP ENVY TouchSmart 17-j100 manuals
Add to My Manuals
Save this manual to your list of manuals |
Page 92 highlights
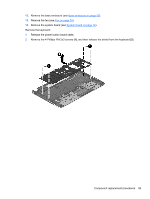
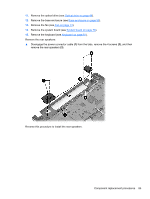
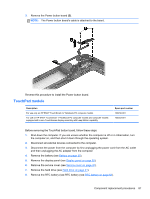
For use in country or region: Spare part number: For use in country or region: Spare part number: For use in Italy 736685-061 For use in the United Kingdom and 736685-031 Singapore For use in Latin America 736685-161 For use in the United States 736685-001 For use in the Netherlands 736685-B31 Keyboard with backlight for use on HP ENVY TouchSmart 17 Notebook PC computer models and computer models equipped with a non-TouchScreen display assembly, but without Leap Motion capability (includes keyboard cable and backlight cable): For use in Belgium 720244-A41 For use in Portugal 720244-131 For use in Canada 720244-DB1 For use in Russia 720244-251 For use in the Czech Republic and 720244-FL1 Slovakia For use in Saudi Arabia 720244-171 For use in Denmark, Finland, and Norway 720244-DH1 For use in Spain 720244-071 For use in France 720244-051 For use in Switzerland 720244-BG1 For use in Germany 720244-041 For use in Turkey 720244-141 For use in Italy 720244-061 For use in the United Kingdom and 720244-031 Singapore For use in the Netherlands 720244-B31 For use in the United States 720244-001 For use in Latin America 720244-161 Keyboard with pointing stick for use on HP ENVY TouchSmart 17 Notebook PC computer models and computer models equipped with a non-TouchScreen display assembly (includes keyboard cable and pointing stick cable): For use in the United States 720242-001 For use in Italy 720242-061 For use in France 720242-051 Before removing the keyboard, follow these steps: 1. Shut down the computer. If you are unsure whether the computer is off or in Hibernation, turn the computer on, and then shut it down through the operating system. 2. Disconnect all external devices connected to the computer. 3. Disconnect the power from the computer by first unplugging the power cord from the AC outlet and then unplugging the AC adapter from the computer. 4. Remove the battery (see Battery on page 39), 5. Remove the display panel (see Display panel on page 50). 6. Remove the service cover (see Service cover on page 40). 7. Remove the hard drive (see Hard drive on page 41). 8. Remove the RTC battery (see RTC battery (see RTC battery on page 54). 9. Remove the memory modules (see Memory modules on page 43). 10. Remove the WLAN module (see WLAN module on page 44). 11. Remove the optical drive (see Optical drive on page 46). 82 Chapter 6 Removal and replacement procedures for Authorized Service Provider parts
-
 1
1 -
2
-
3
-
4
-
5
-
6
-
7
-
8
-
9
-
10
-
11
-
12
-
13
-
14
-
15
-
16
-
17
-
18
-
19
-
20
-
21
-
22
-
23
-
24
-
25
-
26
-
27
-
28
-
29
-
30
-
31
-
32
-
33
-
34
-
35
-
36
-
37
-
38
-
39
-
40
-
41
-
42
-
43
-
44
-
45
-
46
-
47
-
48
-
49
-
50
-
51
-
52
-
53
-
54
-
55
-
56
-
57
-
58
-
59
-
60
-
61
-
62
-
63
-
64
-
65
-
66
-
67
-
68
-
69
-
70
-
71
-
72
-
73
-
74
-
75
-
76
-
77
-
78
-
79
-
80
-
81
-
82
-
83
-
84
-
85
-
86
-
 87
87 -
 88
88 -
 89
89 -
 90
90 -
 91
91 -
 92
92 -
 93
93 -
 94
94 -
 95
95 -
 96
96 -
 97
97 -
98
-
99
-
100
-
101
-
102
-
103
-
104
-
105
-
106
-
107
-
108
-
109
-
110
-
111
-
112
-
113
-
114
-
115
-
116
 |
 |
