HP Indigo 10000 B&R Drive Replacement -- CA493-00640 Rev 00 - Page 5
BR System Address Adjustment
 |
View all HP Indigo 10000 manuals
Add to My Manuals
Save this manual to your list of manuals |
Page 5 highlights
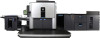
4. Remove the faulty drive from the backplane module. Figure 2-2 B&R drive assembly 1 Drive 2 Backplane module 5. Install the new drive onto the backplane module. 6. Reconnect all of the cables. 7. Remove the cover. 8. Set the drive's powerlink address to the same address as the old drive. Alternatively, follow the instructions in the BR System Address Adjustment document (in CE Suitcase). Figure 2-3 Powerlink address 1 Upper switch (nX16 switch) 2 Lower switch (nX1 switch) Replacing the B&R drive 3
-
 1
1 -
 2
2 -
 3
3 -
 4
4 -
 5
5 -
 6
6 -
 7
7
 |
 |
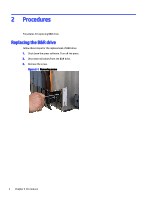
4.
Remove the faulty drive from the backplane module.
Figure 2-2
B&R drive assembly
1
Drive
2
Backplane module
5.
Install the new drive onto the backplane module.
6.
Reconnect all of the cables.
7.
Remove the cover.
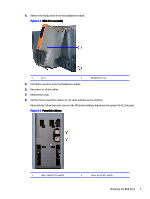
8.
Set the drive’s powerlink address to the same address as the old drive.
Alternatively, follow the instructions in the
BR System Address Adjustment
document (in CE Suitcase).
Figure 2-3
Powerlink address
1
Upper switch (nX16 switch)
2
Lower switch (nX1 switch)
Replacing the B&R drive
3