HP Indigo WS6600 Indigo Technical Tips and Workarounds - Page 50
Linearity correction – plug-in operating instructions, System
 |
View all HP Indigo WS6600 manuals
Add to My Manuals
Save this manual to your list of manuals |
Page 50 highlights
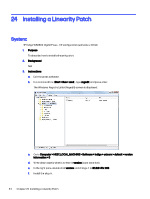
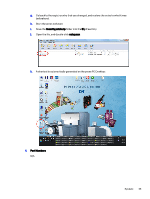
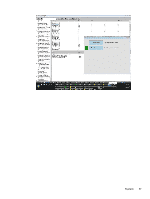
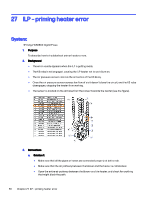
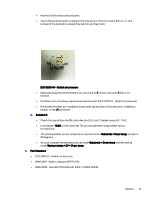
25 Linearity correction - plug-in operating instructions System: HP Indigo WS6600 Digital Press - VR configuration (software v. 8.9.i4) 1. Purpose To describe how to perform linearity correction. 2. Background N/A 3. Instructions a. Activate the correction for specific substrates only where a linearity issue arises. Remember to deactivate the patch after the specific substrate had been used. b. Double-click the desktop shortcut to open the linearity correction window. c. To activate the correction, press linearity correction. A check mark displays, indicating that linearity correction is activated: 46 Chapter 25 Linearity correction - plug-in operating instructions
-
 1
1 -
2
-
3
-
4
-
5
-
6
-
7
-
8
-
9
-
10
-
11
-
12
-
13
-
14
-
15
-
16
-
17
-
18
-
19
-
20
-
21
-
22
-
23
-
24
-
25
-
26
-
27
-
28
-
29
-
30
-
31
-
32
-
33
-
34
-
35
-
36
-
37
-
38
-
39
-
40
-
41
-
42
-
43
-
44
-
 45
45 -
 46
46 -
 47
47 -
 48
48 -
 49
49 -
 50
50 -
 51
51 -
 52
52 -
 53
53 -
 54
54 -
 55
55 -
56
-
57
-
58
-
59
-
60
-
61
-
62
-
63
-
64
-
65
-
66
-
67
-
68
-
69
-
70
-
71
-
72
-
73
-
74
 |
 |

Linearity correction – plug-in operating
instructions
25
System:
HP Indigo WS6600 Digital Press - VR configuration (software v. 8.9.i4)
1.
Purpose
To describe how to perform linearity correction.
2.
Background
N/A
3.
Instructions
a.
Activate the correction for specific substrates only where a linearity issue arises. Remember
to deactivate the patch after the specific substrate had been used.
b.
Double-click the desktop shortcut to open the
linearity correction
window.
c.
To activate the correction, press
linearity correction
.
A check mark displays, indicating that linearity correction is activated:
46
Chapter 25
Linearity correction – plug-in operating instructions