HP Integrity rx4640 Installation Guide, Seventh Edition - HP Integrity rx4640 - Page 53
Slot ID Numbering, Installing Additional PCI-X Cards
 |
View all HP Integrity rx4640 manuals
Add to My Manuals
Save this manual to your list of manuals |
Page 53 highlights
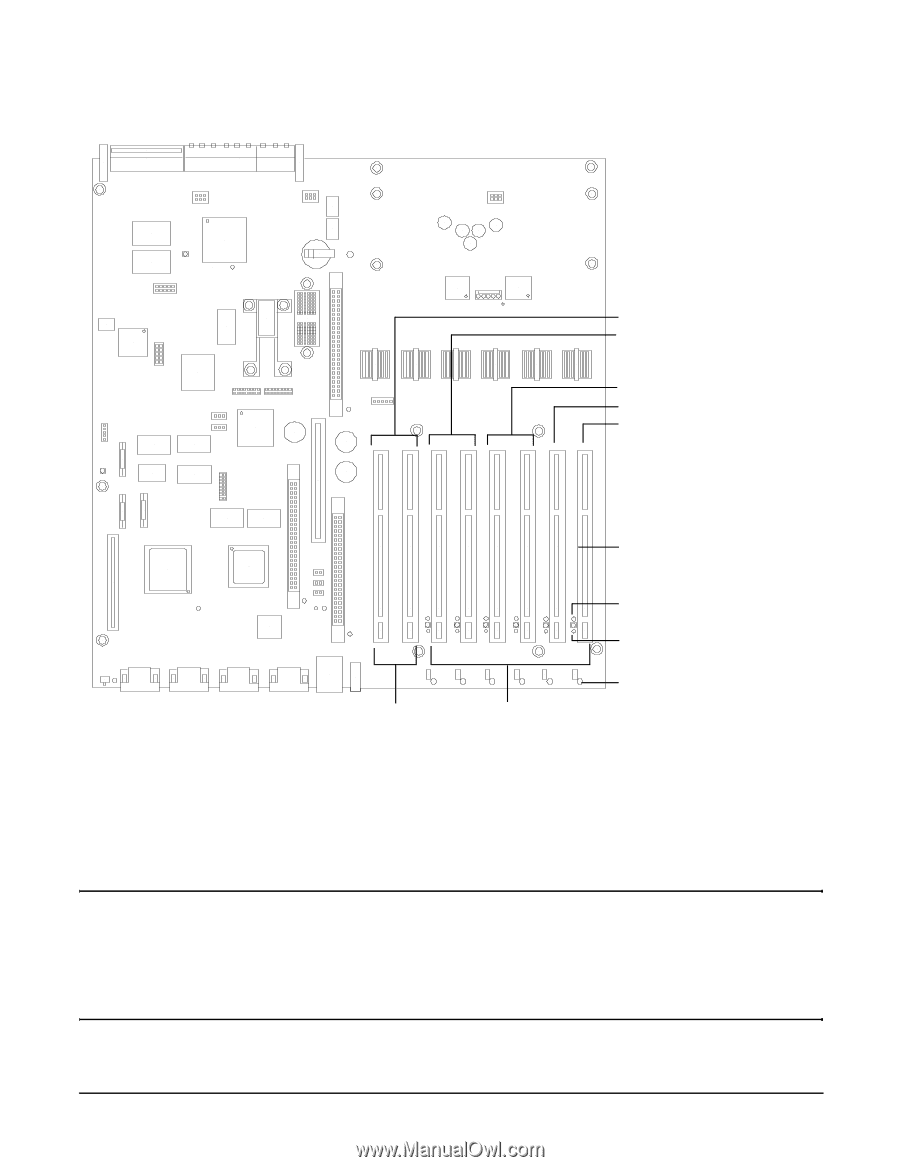
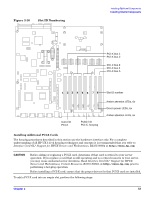
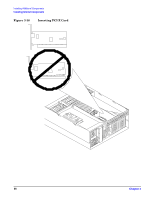
Figure 3-16 Slot ID Numbering Installing Additional Components Installing Internal Components PCI-X bus 1 PCI-X bus 2 PCI-X bus 3 PCI-X bus 4 PCI-X bus 5 1 23 4 5 6 78 Core I/O PCI-X Public I/O PCI-X, hot-plug Slot ID number Amber attention LEDs, 6x Green power LEDs, 6x Amber attention LEDs, 6x Installing Additional PCI-X Cards The hot-plug procedures described in this section use the hardware interface only. For a complete understanding of all HP-UX 11i v2 hot-plug techniques and concepts it is recommended that you refer to Interface Card OL* Support for HPUX Servers and Workstations, B2355-90804 at http://docs.hp.com. CAUTION Before adding or replacing a PCI-X card, determine if that card is critical to your server operation. If you replace a card that is still operating and is a critical resource to your server, you may cause undesired server downtime. Read Interface Card OL* Support for HPUX Servers and Workstations, Critical Resources, B2355-90804, at http://docs.hp.com, prior to performing a hot-plug operation. Before installing a PCI-X card, ensure that the proper drivers for that PCI-X card are installed. To add a PCI-X card into an empty slot, perform the following steps: Chapter 3 53
-
 1
1 -
2
-
3
-
4
-
5
-
6
-
7
-
8
-
9
-
10
-
11
-
12
-
13
-
14
-
15
-
16
-
17
-
18
-
19
-
20
-
21
-
22
-
23
-
24
-
25
-
26
-
27
-
28
-
29
-
30
-
31
-
32
-
33
-
34
-
35
-
36
-
37
-
38
-
39
-
40
-
41
-
42
-
43
-
44
-
45
-
46
-
47
-
 48
48 -
 49
49 -
 50
50 -
 51
51 -
 52
52 -
 53
53 -
 54
54 -
 55
55 -
 56
56 -
 57
57 -
 58
58 -
59
-
60
-
61
-
62
-
63
-
64
-
65
-
66
-
67
-
68
-
69
-
70
-
71
-
72
-
73
-
74
-
75
-
76
-
77
-
78
-
79
-
80
-
81
-
82
-
83
-
84
-
85
-
86
-
87
-
88
-
89
-
90
-
91
-
92
-
93
-
94
-
95
-
96
-
97
-
98
-
99
-
100
-
101
-
102
-
103
-
104
-
105
-
106
-
107
-
108
-
109
-
110
-
111
-
112
-
113
 |
 |