HP Integrity rx5670 CPU Installation Product Update - Page 3
Important Steps
 |
View all HP Integrity rx5670 manuals
Add to My Manuals
Save this manual to your list of manuals |
Page 3 highlights
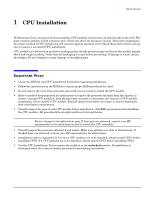
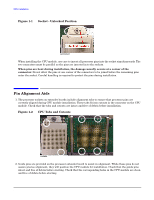
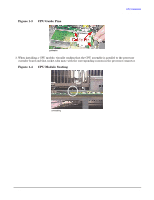
1 CPU Installation CPU Installation Important Steps Problems have been encountered when installing CPU modules on processor extender boards in the field. The most common problem is bent processor pins, which can short out processor circuits. This notice emphasizes the proper method of CPU installation and cautions against potential errors. Read these instructions and use care to ensure a successful CPU installation. CPU modules are delivered in protective packaging that shields processor pins and braces the module against shock and rough handling. Verify that the packaging is intact before proceeding. If damage is noted, contact the shipper. Do not attempt to repair damage or straighten pins. Important Steps • Locate the ESD kit and CPU Installation Tool before beginning installation. • Follow the instructions in the ESD kit to ensure proper ESD procedures are used. • Do not remove the cover from processor pins until you are ready to install the CPU module. • Refer to product documentation for instructions to remove the processor extender from the chassis, to remove existing CPU module(s) from the processor extender, to determine the location of CPU module installation, and to install a CPU module. Read all instructions before you begin, to ensure familiarity with installation requirements. • Visually inspect the pins of each CPU module before installation. (Use ESD precautions when handling the CPU module.) All pins should be straight and free of dirt and debris. NOTE Do not attempt to straighten bent pins. If bent pins are observed, contact your HP representative for instructions on how to return the CPU assembly. • Visually inspect the processor extender board socket. Make sure all holes are clear of obstructions. If blocked holes are observed, contact your HP representative for instructions. • Installation order is important. If 2 or more CPU modules are to be installed, always install CPU1 before installing CPU0. If 4 CPU modules are to be installed, always install CPU3 before installing CPU2. • Use the CPU Installation Tool to ensure the socket is in the unlocked position. If installation is attempted when the socket is locked, pins may be bent during installation. Chapter 1 3
-
 1
1 -
 2
2 -
 3
3 -
 4
4 -
 5
5 -
 6
6
 |
 |
