HP Kayak XU 04xx HP 10BT/100TX Night Director/100 Ethernet Card Installation G - Page 18
Post-installation Procedure, Post-installation on a Windows 95 System
 |
View all HP Kayak XU 04xx manuals
Add to My Manuals
Save this manual to your list of manuals |
Page 18 highlights
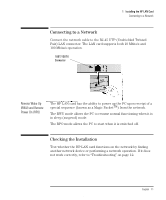
CAUTION CAUTION 1 Installing the HP LAN Card Post-installation Procedure Post-installation Procedure Make sure that you have installed the HP LAN card before you perform the post-installation step. Post-installation on a Windows 95 System 1 Restart the PC. Windows 95 automatically detects, and installs the software for, the HP LAN card. You may be asked to insert one of the Windows 95 installation diskettes. 2 Restart your PC when prompted to do so. Remember to remove the HP LAN Setup diskette before you do this. The HP LAN card is now ready to use. Post-installation on a Windows NT 4.0 System 1 Restart the PC and start Windows. You do not need to press + + to log on. 2 When prompted to do so, insert the HP LAN Setup diskette into the diskette drive, and click OK. The setup wizard starts, and displays a dialog box indicating that the PC is ready to install the HP LAN card. 3 Type the path to the NT master disk (C:\I386 if the operating system files were copied to the hard disk during the installation of Windows NT), then click Next. The installation of the HP LAN card starts automatically. When the installation is complete, the last page of the wizard is displayed. 4 Click Finish to end the wizard. 5 Restart your PC when prompted to do so. Remember to remove the HP LAN Setup diskette before you do this. If a service pack was already installed on the PC before the HP LAN card was installed, the service pack must be re-installed before the HP LAN card will function. The HP LAN card is now ready to use. 10 English 18
-
 1
1 -
2
-
3
-
4
-
5
-
6
-
7
-
8
-
9
-
10
-
11
-
12
-
 13
13 -
 14
14 -
 15
15 -
 16
16 -
 17
17 -
 18
18 -
 19
19 -
 20
20 -
 21
21 -
 22
22 -
 23
23 -
24
-
25
-
26
-
27
-
28
-
29
-
30
-
31
-
32
-
33
-
34
-
35
-
36
-
37
-
38
-
39
-
40
-
41
-
42
-
43
-
44
-
45
-
46
-
47
-
48
-
49
-
50
-
51
-
52
-
53
-
54
-
55
-
56
-
57
-
58
-
59
-
60
-
61
-
62
-
63
-
64
-
65
-
66
-
67
-
68
-
69
-
70
-
71
-
72
-
73
-
74
-
75
-
76
-
77
-
78
-
79
-
80
-
81
-
82
-
83
-
84
-
85
-
86
-
87
-
88
-
89
-
90
-
91
-
92
-
93
-
94
-
95
-
96
-
97
-
98
-
99
-
100
-
101
-
102
-
103
-
104
-
105
-
106
-
107
-
108
-
109
-
110
-
111
-
112
-
113
-
114
-
115
-
116
-
117
-
118
-
119
-
120
-
121
 |
 |
