HP Kayak XU 04xx HP Kayak XU Series 03xx PC Workstation - Service Handbook - Page 5
Installing a Dual Processor / Replacing a Processor
 |
View all HP Kayak XU 04xx manuals
Add to My Manuals
Save this manual to your list of manuals |
Page 5 highlights
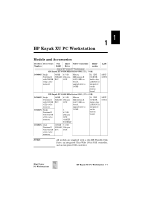
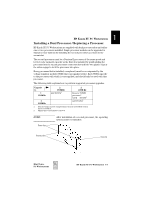
HP Kayak XU PC Workstation 1 Installing a Dual Processor / Replacing a Processor HP Kayak XU PC Workstations are supplied with dual processor slots and either one or two processors installed. Single processor models can be upgraded to dual processor systems by installing the second processor accessory in the vacant slot. The second processor must be a Pentium II processor of the same speed and level-2 cache memory capacity as the first. It is installed by gently sliding the processor into the vacant processor connector slot until the two plastic clips at the sides engage to lock the processor into place. Every processor that is installed, or replaced, must be accompanied by the voltage regulator module (VRM) that was supplied with it. Each VRM is specific to the processor with which it was supplied, and should only be used with that processor. The following table explains how to perform supported processor upgrades. Upgrade to 1 ! 350MHz 1! 400MHz 2 ! 350MHz Add D6527A1 2 ! 400M Hz Remove 350MHz processor2 Add 2 ! D6528A1 Add D6528A1 1. Switch settings must be changed. Ensure that the latest BIOS version has been installed. 2. Supplied processor must be removed. NOTE: Plastic clips After installation of a second processor, the operating system must be reinstalled. Bracket pillars Heat-sink Mini-Tower PC Workstations HP Kayak XU PC Workstation 1-5
-
 1
1 -
 2
2 -
 3
3 -
 4
4 -
 5
5 -
 6
6 -
 7
7 -
 8
8 -
 9
9 -
 10
10 -
 11
11 -
12
 |
 |
