HP Kayak XW U3-W3 HP Kayak XU Series 03xx, User's Guide - Page 50
Installing More Memory on the Video Adapter
 |
View all HP Kayak XW U3-W3 manuals
Add to My Manuals
Save this manual to your list of manuals |
Page 50 highlights
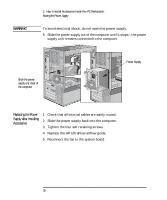
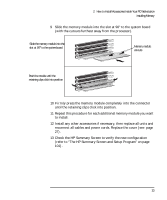
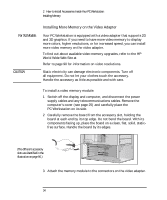
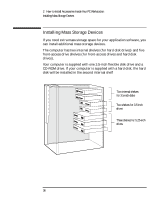
2 How to Install Accessories Inside Your PC Workstation Installing Memory For XU Models CAUTION Installing More Memory on the Video Adapter Your PC Workstation is equipped with a video adapter that supports 2D and 3D graphics. If you need to have more video memory to display more colors, higher resolutions, or for increased speed, you can install more video memory on the video adapter. To find out about available video memory upgrades, refer to the HP World Wide Web Site at http://www.hp.com/go/kayaksupport/ Refer to page 90 for information on video resolutions. Static electricity can damage electronic components. Turn off all equipment. Do not let your clothes touch the accessory. Handle the accessory as little as possible and with care. To install a video memory module: 1 Switch off the display and computer, and disconnect the power supply cables and any telecommunications cables. Remove the computer's cover (see page 25) and carefully place the PC Workstation on its side. 2 Carefully remove the board from the accessory slot, holding the board at each end by its top edge. Do not bend the board. With its components facing up, place the board on a clean, flat, solid, staticfree surface. Handle the board by its edges. (The different accessory slots are identified in the illustration on page 96.) 3 Attach the memory module to the connectors on the video adapter. 34 English
-
 1
1 -
2
-
3
-
4
-
5
-
6
-
7
-
8
-
9
-
10
-
11
-
12
-
13
-
14
-
15
-
16
-
17
-
18
-
19
-
20
-
21
-
22
-
23
-
24
-
25
-
26
-
27
-
28
-
29
-
30
-
31
-
32
-
33
-
34
-
35
-
36
-
37
-
38
-
39
-
40
-
41
-
42
-
43
-
44
-
 45
45 -
 46
46 -
 47
47 -
 48
48 -
 49
49 -
 50
50 -
 51
51 -
 52
52 -
 53
53 -
 54
54 -
 55
55 -
56
-
57
-
58
-
59
-
60
-
61
-
62
-
63
-
64
-
65
-
66
-
67
-
68
-
69
-
70
-
71
-
72
-
73
-
74
-
75
-
76
-
77
-
78
-
79
-
80
-
81
-
82
-
83
-
84
-
85
-
86
-
87
-
88
-
89
-
90
-
91
-
92
-
93
-
94
-
95
-
96
-
97
-
98
-
99
-
100
-
101
-
102
-
103
-
104
-
105
-
106
-
107
-
108
-
109
-
110
-
111
-
112
-
113
-
114
-
115
-
116
-
117
-
118
-
119
-
120
-
121
-
122
-
123
-
124
-
125
-
126
-
127
-
128
-
129
-
130
-
131
-
132
-
133
-
134
-
135
-
136
-
137
-
138
-
139
-
140
-
141
-
142
-
143
-
144
-
145
-
146
-
147
-
148
-
149
-
150
-
151
-
152
-
153
-
154
-
155
-
156
-
157
-
158
-
159
-
160
-
161
-
162
-
163
-
164
-
165
-
166
-
167
-
168
-
169
-
170
-
171
-
172
-
173
-
174
-
175
-
176
-
177
-
178
-
179
-
180
-
181
-
182
-
183
-
184
-
185
-
186
-
187
-
188
-
189
-
190
 |
 |
