HP LH4r HP Netserver LC II Installation Roadmap - Page 6
Install in Rack Optional, Con the HP NetServer, Verify Installed Accessories, Optional,
 |
View all HP LH4r manuals
Add to My Manuals
Save this manual to your list of manuals |
Page 6 highlights
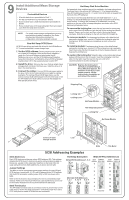
10 Replace All Covers and Connect All Cables 1. Lower the system board: If the system board is in the raised position, hold the handles of the retaining latches vertical, and push the system board down to seat it firmly in its slot. Then, lower the retaining latches simultaneously to secure the board. 2. Replace all covers: a. If a side cover was removed, insert its lower channel onto the lip at the bottom of the chassis. Press the top of the side cover against the chassis, so that it snaps it into place. b. To replace the top cover, align both corners of its rear edge against the similar sheet metal on the rear of the HP NetServer. Lower the front of the top cover and pull it forward slightly to catch on the rear of the chassis and to clear the front edge of the chassis. Tighten both thumbscrews. c. Align the front bezel against the front of the HP NetServer, and press it firmly into place. Lock the front bezel with the key provided. 3. Connect the power cord and all other cables. CAUTION Replace ALL covers before operating the HP NetServer, even for a short time. Otherwise, overheating can damage processors, boards, and mass storage devices. System Board SCidoever 1 3 Thumbscrews 1 TCoopver 2 Front Bezel 11 Verify Installed Accessories (Optional) If you wish, you may now verify accessories you have installed. Turn on the HP NetServer and monitor, and view the the boot screen. 12 Configure the HP NetServer 1. Turn on the HP NetServer and monitor, and insert the HP Navigator CD-ROM into the drive. Turn the power off, wait 10 seconds, and turn the power on again. If the system fails to restart, follow the instructions on the screen. NOTE If you have installed an ISA non-Plug-and-Play accessory board, you must reserve system resources for it by using the Setup utility. Start the Setup utility by pressing the F2 function key when "Press to enter SETUP" appears on the boot screen. When the Setup utility starts, select "Configuration," and then select "ISA non-Plug-and-Play Devices." Use the arrow keys to highlight a selection, press ENTER to display its options, and use the +/- keys to change values. When done, exit saving changes. For more about reserving system resources, refer to Information Assistant and to "Configuring ISA Non-Plug-and-Play Board" in Chapter 4, "Accessories," in the HP NetServer LC II Series User Guide. (If the system hangs before the Setup utility starts, remove the ISA non-Plug-and Play board, run the Setup utility to reserve system resources for it, and reinstall the board.) 2. Run Configuration Assistant and Installation Assistant: Go to the HP Navigator Main Menu. If you want to change the language, select "Set Preferences" and the language. Select "Configuration and Installation Assistant." Select "Express" from the next screen to begin the "Express" mode of configuration. "Custom" configuration mode and "Replication" configuration mode are also available. Refer to the HP NetServer LC II User Guide for details. NOTE To use the Console Redirection feature of Integrated Remote Assistant to run server management utilities remotely, you must create the utility partition. "Express" configuration mode creates it automatically. If you use "Custom" configuration mode, create the partition by selecting "Install/Update Utility Partition" from the Custom Configuration menu within Configuration Assistant. NOTE SCSI devices connected to a disk array controller board (DAC) cannot be displayed at boot time. An ISA non-Plugand-Play board cannot be displayed at boot time. The boot screen lists the hardware that the system detected, such as CPU, DIMMs, and PCI and ISA boards. If the system fails to restart, follow the instructions on the screen. 3. Select the NOS: Select the NOS you will install, and the version if necessary. Installation of the optional IntranetWare NOS, which is in the HP NetServer Software Option Package, requires the key obtained in Section 5: "Prepare for Installation." 4. Select the NOS installation mode: If you select certain versions of Novell NetWare / IntranetWare or Microsoft Windows NT Server, you will be asked, "Would you like to use HP's automated mode of NOS installation?" If you want to use automated NOS installation, select "Yes." Choose automated NOS installation mode for first-time installation of Novell NetWare / IntranetWare or Microsoft Windows NT Server on a factory-configured HP NetServer LC II. Perform a manual NOS installation if you are installing a NOS other than Novell NetWare / IntranetWare or Microsoft Windows NT Server, or if you replaced HP components. (For example, if you replaced an HP network interface controller board with a thirdparty board, install the NOS manually.) 5. Configure Remote Management: If you plan to manage the HP NetServer LC II remotely, refer to the HP NetServer LC II Remote Administrator Guide. Select "Configure Remote Management" on the Configure Remote Management screen to start the utility that configures Integrated Remote Assistant. 6. Configure Disk Array: If you have a disk array, refer to the HP NetRAID Series Installation and Configuration Guide. Select "Execute" on the Configure Disk Array screen to start the utility that configures the disk array. 7. Install the NOS: If you selected the HP automated NOS installation process, you will be guided through the process by a series of HP display screens. To install the NOS manually: ! On the Create Driver Diskette(s) screen, select "Create Drivers Diskette(s)." ! On the Show NOS Installation Instructions screen, select "Save to Disk." Then print out the Network Operating System Installation Instructions from the disk. Read these instructions before starting to install the NOS. ! Follow the instructions on the screen and the Network Operating System Installation Instructions to perform the manual NOS installation. 8. HP NetServer management: Refer to the HP NetServer Management Reference Guide, and install HP TopTools. 13 Install in Rack (Optional) To install the HP NetServer in a rack assembly, refer to the following: • Rack installation kit instructions • HP NetServer Rack Assembly and Cabling Reference Guide After completing the installation in the rack assembly, return to the HP NetServer Rack Installation Road Map.
-
 1
1 -
 2
2 -
 3
3 -
 4
4 -
 5
5 -
 6
6
 |
 |
