HP LaserJet 3200 Service Manual - Page 91
Covers, DIMMs
 |
View all HP LaserJet 3200 manuals
Add to My Manuals
Save this manual to your list of manuals |
Page 91 highlights
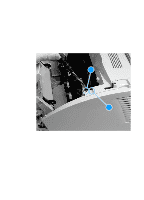
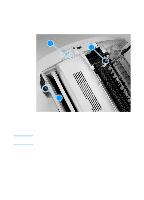
Covers DIMMs 1 Turn the product so that you face the back. 2 Lift open the door at the back of the product. 3 Push the anchors on each side away from the DIMMs. Figure 18. Note DIMMs removal 4 If there is a DIMM in slot 1, lift it straight up to remove it, and then place it on an ESD mat. 5 Repeat step 4 for the DIMM in slot 2 (memory DIMM) and slot 3 (ROM DIMM). When reinstalling DIMMs, they must be reinstalled to the slots from which they were removed. 6 After you remove the DIMMs, press the anchors back to their closed position. If the anchors remain in the open position, they can interfere with smooth removal of the back cover. EN Covers 89
-
 1
1 -
2
-
3
-
4
-
5
-
6
-
7
-
8
-
9
-
10
-
11
-
12
-
13
-
14
-
15
-
16
-
17
-
18
-
19
-
20
-
21
-
22
-
23
-
24
-
25
-
26
-
27
-
28
-
29
-
30
-
31
-
32
-
33
-
34
-
35
-
36
-
37
-
38
-
39
-
40
-
41
-
42
-
43
-
44
-
45
-
46
-
47
-
48
-
49
-
50
-
51
-
52
-
53
-
54
-
55
-
56
-
57
-
58
-
59
-
60
-
61
-
62
-
63
-
64
-
65
-
66
-
67
-
68
-
69
-
70
-
71
-
72
-
73
-
74
-
75
-
76
-
77
-
78
-
79
-
80
-
81
-
82
-
83
-
84
-
85
-
 86
86 -
 87
87 -
 88
88 -
 89
89 -
 90
90 -
 91
91 -
 92
92 -
 93
93 -
 94
94 -
 95
95 -
 96
96 -
97
-
98
-
99
-
100
-
101
-
102
-
103
-
104
-
105
-
106
-
107
-
108
-
109
-
110
-
111
-
112
-
113
-
114
-
115
-
116
-
117
-
118
-
119
-
120
-
121
-
122
-
123
-
124
-
125
-
126
-
127
-
128
-
129
-
130
-
131
-
132
-
133
-
134
-
135
-
136
-
137
-
138
-
139
-
140
-
141
-
142
-
143
-
144
-
145
-
146
-
147
-
148
-
149
-
150
-
151
-
152
-
153
-
154
-
155
-
156
-
157
-
158
-
159
-
160
-
161
-
162
-
163
-
164
-
165
-
166
-
167
-
168
-
169
-
170
-
171
-
172
-
173
-
174
-
175
-
176
-
177
-
178
-
179
-
180
-
181
-
182
-
183
-
184
-
185
-
186
-
187
-
188
-
189
-
190
-
191
-
192
-
193
-
194
-
195
-
196
-
197
-
198
-
199
-
200
-
201
-
202
-
203
-
204
-
205
-
206
-
207
-
208
-
209
-
210
-
211
-
212
-
213
-
214
-
215
-
216
-
217
-
218
-
219
-
220
-
221
-
222
-
223
-
224
-
225
-
226
-
227
-
228
-
229
-
230
-
231
-
232
-
233
-
234
-
235
-
236
-
237
-
238
-
239
-
240
-
241
-
242
-
243
-
244
-
245
-
246
-
247
-
248
-
249
-
250
-
251
-
252
-
253
-
254
-
255
-
256
-
257
-
258
-
259
-
260
-
261
-
262
-
263
-
264
-
265
-
266
-
267
-
268
 |
 |

EN
Covers
89
Covers
DIMMs
1
Turn the product so that you face the back.
2
Lift open the door at the back of the product.
3
Push the anchors on each side away from the DIMMs.
Figure 18.
DIMMs removal
4
If there is a DIMM in slot 1, lift it straight up to remove it, and then
place it on an ESD mat.
5
Repeat step 4 for the DIMM in slot 2 (memory DIMM) and slot 3
(ROM DIMM).
Note
When reinstalling DIMMs, they must be reinstalled to the slots from
which they were removed.
6
After you remove the DIMMs, press the anchors back to their
closed position. If the anchors remain in the open position, they
can interfere with smooth removal of the back cover.