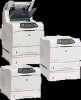
HP LaserJet 4250 HP LaserJet 4250/4350 Series - User Guide - Page 103
Information tab, Settings tab, HP Instant Support - password
 |
View all HP LaserJet 4250 manuals
Add to My Manuals
Save this manual to your list of manuals |
Page 103 highlights
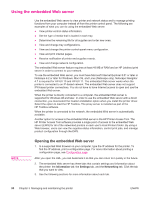
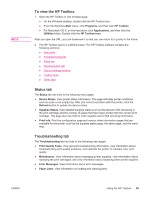
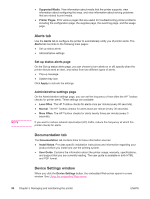
Information tab The Information pages group consists of the following pages. ● Device Status. This page shows the printer status and shows the life remaining of HP supplies, with 0% representing that a supply is empty. The page also shows the type and size of print media set for each tray. To change the default settings, click Change Settings. ● Configuration page. This page shows the information that is found on the printer configuration page. ● Supplies Status. This page shows the life remaining of HP supplies, with 0% representing that a supply is empty. This page also provides supplies part numbers. To order new supplies, click Order Supplies in the Other Links area of the window. To visit any Web site, you must have Internet access. ● Event log. This page shows a list of all printer events and errors. ● Device information. This page also shows the printer network name, address, and model information. To change these entries, click Device Information on the Settings tab. ● Control panel. Click this button to view the current status of the printer control panel. Settings tab Use this tab to configure the printer from your computer. The Settings tab can be password protected. If this printer is networked, always consult with the printer administrator before changing settings on this tab. The Settings tab contains the following pages. ● Configure Device. Configure all printer settings from this page. This page contains the traditional menus found on printers that use a control-panel display. These menus include Information, Paper Handling, and Configure Device. ● Alerts. Network only. Set up to receive e-mail alerts for various printer and supplies events. ● Email. Network only. Used in conjunction with the Alerts page to set up incoming and outgoing e-mail. ● Security. Set a password that must be typed in order to gain access to the Settings and Networking tabs. Turn on and off certain features of the EWS. ● Other Links. Add or customize a link to another Web site. This link is shown in the Other Links area on all embedded Web server pages. These permanent links always appear in the Other Links area: HP Instant Support, Order Supplies, and Product Support. ● Device Information. Name the printer and assign an asset number to it. Type the name and e-mail address for the primary contact who will receive information about the printer. ● Language. Determine the language in which to show the embedded Web server information. ● Time Services. Set the printer to retrieve the date and time from a network server at regular intervals. ENWW Using the embedded Web server 91
-
 1
1 -
2
-
3
-
4
-
5
-
6
-
7
-
8
-
9
-
10
-
11
-
12
-
13
-
14
-
15
-
16
-
17
-
18
-
19
-
20
-
21
-
22
-
23
-
24
-
25
-
26
-
27
-
28
-
29
-
30
-
31
-
32
-
33
-
34
-
35
-
36
-
37
-
38
-
39
-
40
-
41
-
42
-
43
-
44
-
45
-
46
-
47
-
48
-
49
-
50
-
51
-
52
-
53
-
54
-
55
-
56
-
57
-
58
-
59
-
60
-
61
-
62
-
63
-
64
-
65
-
66
-
67
-
68
-
69
-
70
-
71
-
72
-
73
-
74
-
75
-
76
-
77
-
78
-
79
-
80
-
81
-
82
-
83
-
84
-
85
-
86
-
87
-
88
-
89
-
90
-
91
-
92
-
93
-
94
-
95
-
96
-
97
-
 98
98 -
 99
99 -
 100
100 -
 101
101 -
 102
102 -
 103
103 -
 104
104 -
 105
105 -
 106
106 -
 107
107 -
 108
108 -
109
-
110
-
111
-
112
-
113
-
114
-
115
-
116
-
117
-
118
-
119
-
120
-
121
-
122
-
123
-
124
-
125
-
126
-
127
-
128
-
129
-
130
-
131
-
132
-
133
-
134
-
135
-
136
-
137
-
138
-
139
-
140
-
141
-
142
-
143
-
144
-
145
-
146
-
147
-
148
-
149
-
150
-
151
-
152
-
153
-
154
-
155
-
156
-
157
-
158
-
159
-
160
-
161
-
162
-
163
-
164
-
165
-
166
-
167
-
168
-
169
-
170
-
171
-
172
-
173
-
174
-
175
-
176
-
177
-
178
-
179
-
180
-
181
-
182
-
183
-
184
-
185
-
186
-
187
-
188
-
189
-
190
-
191
-
192
-
193
-
194
-
195
-
196
-
197
-
198
-
199
-
200
-
201
-
202
-
203
-
204
-
205
-
206
-
207
-
208
-
209
-
210
-
211
-
212
-
213
-
214
-
215
-
216
-
217
-
218
-
219
-
220
-
221
-
222
-
223
-
224
-
225
-
226
-
227
-
228
-
229
-
230
-
231
-
232
-
233
-
234
-
235
-
236
-
237
-
238
-
239
-
240
-
241
-
242
-
243
-
244
-
245
-
246
-
247
-
248
-
249
-
250
-
251
-
252
-
253
-
254
-
255
-
256
-
257
-
258
-
259
-
260
-
261
-
262
-
263
-
264
-
265
-
266
-
267
-
268
-
269
-
270
-
271
-
272
-
273
-
274
-
275
-
276
-
277
-
278
-
279
-
280
-
281
-
282
-
283
-
284
-
285
-
286
-
287
-
288
-
289
-
290
-
291
-
292
-
293
-
294
-
295
-
296
-
297
-
298
-
299
-
300
-
301
-
302
-
303
-
304
 |
 |
