HP LaserJet M9040/M9050 HP LaserJet M9040/M9050 MFP - Job Aid - Fax - Page 7
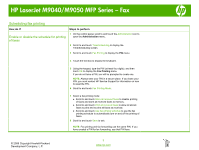
Scheduling fax printing
 |
View all HP LaserJet M9040/M9050 manuals
Add to My Manuals
Save this manual to your list of manuals |
Page 7 highlights
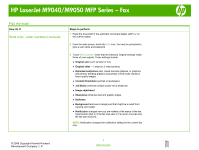
HP LaserJet M9040/M9050 MFP Series - Fax Scheduling fax printing How do I? Steps to perform Enable or disable the schedule for printing of faxes 1 On the control panel, scroll to and touch the Administration icon to open the Administration menu. 2 Scroll to and touch Time/Scheduling to display the Time/Scheduling screen. 3 Scroll to and touch Fax Printing to display the PIN menu. 4 Touch the text box to display the keyboard. 5 Using the keypad, type the PIN (at least four digits), and then touch OK to display the Fax Printing menu. If you do not have a PIN, you will be prompted to create one. NOTE: Always save your PIN in a secure place. If you loose your PIN, you must contact HP Service Support for information on how to reset the PIN. 6 Scroll to and touch Fax Printing Mode. 7 Select a fax printing mode: ● Scroll to and touch Store all received faxes to disable printing of faxes and store all received faxes to memory. ● Scroll to and touch Print all received faxes to allow all stored faxes to print and to print all faxes as received. ● Scroll to and touch Use fax printing schedule to use the fax printing schedule to automatically turn on and off the printing of faxes. 8 Scroll to and touch Save to exit. NOTE: Fax printing and fax forwarding use the same PIN. If you have created a PIN for fax forwarding, use that PIN here. © 2008 Copyright Hewlett-Packard Development Company, L.P. 1 www.hp.com
-
 1
1 -
 2
2 -
 3
3 -
 4
4 -
 5
5 -
 6
6 -
 7
7
 |
 |
