HP LaserJet Pro 300 Service Manual - Page 154
Network Setup menu - firmware
 |
View all HP LaserJet Pro 300 manuals
Add to My Manuals
Save this manual to your list of manuals |
Page 154 highlights
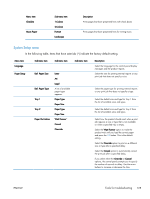
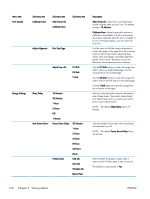
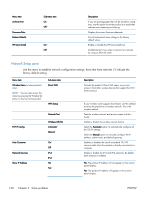
Menu item Archive Print Firmware Date Restore Defaults HP Smart Install Sub-menu item On Off* On* Off Description If you are printing pages that will be stored for a long time, use this option to set the product to a mode that reduces toner smearing and dusting. Displays the current firmware datecode. Sets all customized menu settings to the factory default values. Enable or disable the HP Smart Install tool. Disable the tool if you want to connect to a network by using an Ethernet cable. Network Setup menu Use this menu to establish network configuration settings. Items that have asterisks (*) indicate the factory default setting. Menu item Wireless Menu (wireless products only) NOTE: You can also access this menu by pressing the Wireless button on the front of the product. Sub-menu item Direct WiFi WPS Setup TCP IP Config Network Test Wireless Off/On Automatic* Manual Auto Crossover Network Services Show IP Address On* Off IPv4 IPv6 No Yes* Description Provides the product's Direct Wifi name, so you can access it from other wireless devices that support the Wi-Fi Direct protocol. If your wireless router supports this feature, use this method to set up the product on a wireless network. This is the simplest method. Tests the wireless network and prints a report with the results. Enable or disable the wireless network feature. Select the Automatic option to automatically configure all the TCP/IP settings. Select the Manual option to manually configure the IP address, subnet mask, and default gateway. Enables or disables the use of a standard 10/100 network cable when the product is directly connected to a computer. Enable or disable the IPv4 and IPv6 protocols. By default, each protocol is enabled. No: The product IP address will not appear on the control panel display. Yes: The product IP address will appear on the control panel display. 130 Chapter 2 Solve problems ENWW
-
 1
1 -
2
-
3
-
4
-
5
-
6
-
7
-
8
-
9
-
10
-
11
-
12
-
13
-
14
-
15
-
16
-
17
-
18
-
19
-
20
-
21
-
22
-
23
-
24
-
25
-
26
-
27
-
28
-
29
-
30
-
31
-
32
-
33
-
34
-
35
-
36
-
37
-
38
-
39
-
40
-
41
-
42
-
43
-
44
-
45
-
46
-
47
-
48
-
49
-
50
-
51
-
52
-
53
-
54
-
55
-
56
-
57
-
58
-
59
-
60
-
61
-
62
-
63
-
64
-
65
-
66
-
67
-
68
-
69
-
70
-
71
-
72
-
73
-
74
-
75
-
76
-
77
-
78
-
79
-
80
-
81
-
82
-
83
-
84
-
85
-
86
-
87
-
88
-
89
-
90
-
91
-
92
-
93
-
94
-
95
-
96
-
97
-
98
-
99
-
100
-
101
-
102
-
103
-
104
-
105
-
106
-
107
-
108
-
109
-
110
-
111
-
112
-
113
-
114
-
115
-
116
-
117
-
118
-
119
-
120
-
121
-
122
-
123
-
124
-
125
-
126
-
127
-
128
-
129
-
130
-
131
-
132
-
133
-
134
-
135
-
136
-
137
-
138
-
139
-
140
-
141
-
142
-
143
-
144
-
145
-
146
-
147
-
148
-
 149
149 -
 150
150 -
 151
151 -
 152
152 -
 153
153 -
 154
154 -
 155
155 -
 156
156 -
 157
157 -
 158
158 -
 159
159 -
160
-
161
-
162
-
163
-
164
-
165
-
166
-
167
-
168
-
169
-
170
-
171
-
172
-
173
-
174
-
175
-
176
-
177
-
178
-
179
-
180
-
181
-
182
-
183
-
184
-
185
-
186
-
187
-
188
-
189
-
190
-
191
-
192
-
193
-
194
-
195
-
196
-
197
-
198
-
199
-
200
-
201
-
202
-
203
-
204
-
205
-
206
-
207
-
208
-
209
-
210
-
211
-
212
-
213
-
214
-
215
-
216
-
217
-
218
-
219
-
220
-
221
-
222
-
223
-
224
-
225
-
226
-
227
-
228
-
229
-
230
-
231
-
232
-
233
-
234
-
235
-
236
-
237
-
238
-
239
-
240
-
241
-
242
-
243
-
244
-
245
-
246
-
247
-
248
-
249
-
250
-
251
-
252
-
253
-
254
-
255
-
256
-
257
-
258
-
259
-
260
-
261
-
262
-
263
-
264
-
265
-
266
-
267
-
268
-
269
-
270
 |
 |
