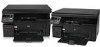
HP LaserJet Pro M1132 HP LaserJet M1130/M1210 MFP User Guide - Page 140
Solve fax problems, Fax troubleshooting checklist, Fax error messages
 |
View all HP LaserJet Pro M1132 manuals
Add to My Manuals
Save this manual to your list of manuals |
Page 140 highlights
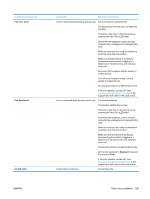
Solve fax problems Fax troubleshooting checklist Tips for fax troubleshooting: ● Print the menu map from the Reports menu to show the control-panel menus and available settings. ● Try to send or receive a fax after implementing each solution. ● Disconnect all devices except for the product. Verify that the telephone cord from the product is plugged directly into the wall telephone jack. 1. Verify that the product firmware is current: a. Print a configuration page from the Reports menu. b. Go to www.hp.com/support/ljm1210series, and select the operating system that you are using. c. Scroll to the firmware table, and then compare the current version listed with the version listed on the configuration page. If versions are different, download the newest firmware. d. Print a new configuration page to verify that the firmware is current. 2. Verify that the telephone cord is plugged into the correct port. 3. Verify that the fax is set up. Use the control panel or the HP Fax Setup Wizard to configure the fax time, date, and fax header information. 4. Check the phone line. a. Unplug the telephone cord from the product. b. Plug the telephone cord into a telephone and verify that there is a dial tone. c. Reconnect the telephone cord into the correct port on the product. 5. If using a DSL service, check the installation and features. The DSL modem requires a high-pass filter. The service provider typically provides a low-pass filter, for normal telephone wiring. 6. If using a VoIP service, check the installation and features. The VoIP service might not support fax over IP. If fax over IP is supported, change the Fax Speed setting to Slow(V.29). 7. If you cannot send or receive faxes, do the following: a. Change the error correction settings. NOTE: Changing these settings might reduce image quality. b. Change the Fax Speed setting to Medium(V.17) or Slow(V.29). Fax error messages Alert and warning messages appear temporarily and might require you to acknowledge the message by pressing the OK button to resume or by pressing the Cancel button to cancel the job. With certain warnings, the job might not complete or the print quality might be affected. If the alert or warning message 126 Chapter 10 Fax (M1210 Series only) ENWW
-
 1
1 -
2
-
3
-
4
-
5
-
6
-
7
-
8
-
9
-
10
-
11
-
12
-
13
-
14
-
15
-
16
-
17
-
18
-
19
-
20
-
21
-
22
-
23
-
24
-
25
-
26
-
27
-
28
-
29
-
30
-
31
-
32
-
33
-
34
-
35
-
36
-
37
-
38
-
39
-
40
-
41
-
42
-
43
-
44
-
45
-
46
-
47
-
48
-
49
-
50
-
51
-
52
-
53
-
54
-
55
-
56
-
57
-
58
-
59
-
60
-
61
-
62
-
63
-
64
-
65
-
66
-
67
-
68
-
69
-
70
-
71
-
72
-
73
-
74
-
75
-
76
-
77
-
78
-
79
-
80
-
81
-
82
-
83
-
84
-
85
-
86
-
87
-
88
-
89
-
90
-
91
-
92
-
93
-
94
-
95
-
96
-
97
-
98
-
99
-
100
-
101
-
102
-
103
-
104
-
105
-
106
-
107
-
108
-
109
-
110
-
111
-
112
-
113
-
114
-
115
-
116
-
117
-
118
-
119
-
120
-
121
-
122
-
123
-
124
-
125
-
126
-
127
-
128
-
129
-
130
-
131
-
132
-
133
-
134
-
 135
135 -
 136
136 -
 137
137 -
 138
138 -
 139
139 -
 140
140 -
 141
141 -
 142
142 -
 143
143 -
 144
144 -
 145
145 -
146
-
147
-
148
-
149
-
150
-
151
-
152
-
153
-
154
-
155
-
156
-
157
-
158
-
159
-
160
-
161
-
162
-
163
-
164
-
165
-
166
-
167
-
168
-
169
-
170
-
171
-
172
-
173
-
174
-
175
-
176
-
177
-
178
-
179
-
180
-
181
-
182
-
183
-
184
-
185
-
186
-
187
-
188
-
189
-
190
-
191
-
192
-
193
-
194
-
195
-
196
-
197
-
198
-
199
-
200
-
201
-
202
-
203
-
204
-
205
-
206
-
207
-
208
-
209
-
210
-
211
-
212
-
213
-
214
-
215
-
216
-
217
-
218
-
219
-
220
-
221
-
222
-
223
-
224
-
225
-
226
-
227
-
228
-
229
-
230
-
231
-
232
-
233
-
234
-
235
-
236
-
237
-
238
-
239
-
240
-
241
-
242
-
243
-
244
-
245
-
246
-
247
-
248
-
249
-
250
-
251
-
252
-
253
-
254
-
255
-
256
-
257
-
258
-
259
-
260
-
261
-
262
-
263
-
264
-
265
-
266
 |
 |
