HP LaserJet Pro M1212nf HP LaserJet M1130/M1210 MFP User Guide - Page 114
Setup for stand-alone fax, Con fax settings, Use the control panel to set the fax time, date - initializing
 |
View all HP LaserJet Pro M1212nf manuals
Add to My Manuals
Save this manual to your list of manuals |
Page 114 highlights
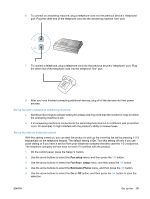
Setup for stand-alone fax 1. Unpack and set up the product. 2. At the control panel, press the Setup button. 3. Use the arrow buttons to select the System setup menu, and then press the OK button. 4. Use the arrow buttons to select the Time/Date menu, and then press the OK button. 5. Use the arrow buttons to select the 12-hour clock or 24-hour clock, and then press the OK button. 6. Use the keypad to enter the current time. 7. Complete one of the following: ● For the 12-hour clock, use the arrow buttons to move past the fourth character. Select 1 for a.m. or 2 for p.m. Press the OK button. ● For the 24-hour clock, press the OK button. 8. Use the keypad to enter the current date. Use two digits to specify the month, day, and year. Press the OK button. 9. Use the arrow buttons to select the Fax setup menu, and then press the OK button. 10. Use the arrow buttons to select the Fax header menu, and then press the OK button. 11. Use the keypad to enter your fax number and your company name or header, and then press the OK button. NOTE: The maximum number of characters for the fax number is 20; use up to 25 characters for the company name. 12. Set other settings as necessary to configure for the product environment. Configure fax settings The product fax settings can be set from the control panel, from HP Toolbox, or from HP Director. At the initial set-up process, the HP Fax Setup Wizard can be used to configure the settings. In the United States and many other countries/regions, setting the time, date, and other fax header information is a legal requirement. Use the control panel to set the fax time, date, and header To use the control panel to set the date, time, and header, complete the following steps: 1. At the control panel, press the Setup button. 2. Use the arrow buttons to select the System setup menu, and then press the OK button. 3. Use the arrow buttons to select the Time/Date menu, and then press the OK button. 4. Use the arrow buttons to select the 12-hour clock or 24-hour clock, and then press the OK button. 5. Use the keypad to enter the current time. 100 Chapter 10 Fax (M1210 Series only) ENWW
-
 1
1 -
2
-
3
-
4
-
5
-
6
-
7
-
8
-
9
-
10
-
11
-
12
-
13
-
14
-
15
-
16
-
17
-
18
-
19
-
20
-
21
-
22
-
23
-
24
-
25
-
26
-
27
-
28
-
29
-
30
-
31
-
32
-
33
-
34
-
35
-
36
-
37
-
38
-
39
-
40
-
41
-
42
-
43
-
44
-
45
-
46
-
47
-
48
-
49
-
50
-
51
-
52
-
53
-
54
-
55
-
56
-
57
-
58
-
59
-
60
-
61
-
62
-
63
-
64
-
65
-
66
-
67
-
68
-
69
-
70
-
71
-
72
-
73
-
74
-
75
-
76
-
77
-
78
-
79
-
80
-
81
-
82
-
83
-
84
-
85
-
86
-
87
-
88
-
89
-
90
-
91
-
92
-
93
-
94
-
95
-
96
-
97
-
98
-
99
-
100
-
101
-
102
-
103
-
104
-
105
-
106
-
107
-
108
-
 109
109 -
 110
110 -
 111
111 -
 112
112 -
 113
113 -
 114
114 -
 115
115 -
 116
116 -
 117
117 -
 118
118 -
 119
119 -
120
-
121
-
122
-
123
-
124
-
125
-
126
-
127
-
128
-
129
-
130
-
131
-
132
-
133
-
134
-
135
-
136
-
137
-
138
-
139
-
140
-
141
-
142
-
143
-
144
-
145
-
146
-
147
-
148
-
149
-
150
-
151
-
152
-
153
-
154
-
155
-
156
-
157
-
158
-
159
-
160
-
161
-
162
-
163
-
164
-
165
-
166
-
167
-
168
-
169
-
170
-
171
-
172
-
173
-
174
-
175
-
176
-
177
-
178
-
179
-
180
-
181
-
182
-
183
-
184
-
185
-
186
-
187
-
188
-
189
-
190
-
191
-
192
-
193
-
194
-
195
-
196
-
197
-
198
-
199
-
200
-
201
-
202
-
203
-
204
-
205
-
206
-
207
-
208
-
209
-
210
-
211
-
212
-
213
-
214
-
215
-
216
-
217
-
218
-
219
-
220
-
221
-
222
-
223
-
224
-
225
-
226
-
227
-
228
-
229
-
230
-
231
-
232
-
233
-
234
-
235
-
236
-
237
-
238
-
239
-
240
-
241
-
242
-
243
-
244
-
245
-
246
-
247
-
248
-
249
-
250
-
251
-
252
-
253
-
254
-
255
-
256
-
257
-
258
-
259
-
260
-
261
-
262
-
263
-
264
-
265
-
266
 |
 |