HP LaserJet Pro P1600 HP LaserJet Professional P1560 and P1600 Series Printer - Page 127
Reinstall the main fan,
 |
View all HP LaserJet Pro P1600 manuals
Add to My Manuals
Save this manual to your list of manuals |
Page 127 highlights
4. Release two tabs (callout 1), and then remove the main fan (callout 2). Figure 2-116 Remove the main fan (4 of 4) 1 2 Reinstall the main fan When the main fan is reinstalled, make sure that the wire harness (callout 1) is correctly positioned, and that the label (callout 2) on the fan faces the inside of the product. Figure 2-117 Reinstall the main fan 1 2 ENWW Main assemblies 109
-
 1
1 -
2
-
3
-
4
-
5
-
6
-
7
-
8
-
9
-
10
-
11
-
12
-
13
-
14
-
15
-
16
-
17
-
18
-
19
-
20
-
21
-
22
-
23
-
24
-
25
-
26
-
27
-
28
-
29
-
30
-
31
-
32
-
33
-
34
-
35
-
36
-
37
-
38
-
39
-
40
-
41
-
42
-
43
-
44
-
45
-
46
-
47
-
48
-
49
-
50
-
51
-
52
-
53
-
54
-
55
-
56
-
57
-
58
-
59
-
60
-
61
-
62
-
63
-
64
-
65
-
66
-
67
-
68
-
69
-
70
-
71
-
72
-
73
-
74
-
75
-
76
-
77
-
78
-
79
-
80
-
81
-
82
-
83
-
84
-
85
-
86
-
87
-
88
-
89
-
90
-
91
-
92
-
93
-
94
-
95
-
96
-
97
-
98
-
99
-
100
-
101
-
102
-
103
-
104
-
105
-
106
-
107
-
108
-
109
-
110
-
111
-
112
-
113
-
114
-
115
-
116
-
117
-
118
-
119
-
120
-
121
-
 122
122 -
 123
123 -
 124
124 -
 125
125 -
 126
126 -
 127
127 -
 128
128 -
 129
129 -
 130
130 -
 131
131 -
 132
132 -
133
-
134
-
135
-
136
-
137
-
138
-
139
-
140
-
141
-
142
-
143
-
144
-
145
-
146
-
147
-
148
-
149
-
150
-
151
-
152
-
153
-
154
-
155
-
156
-
157
-
158
-
159
-
160
-
161
-
162
-
163
-
164
-
165
-
166
-
167
-
168
-
169
-
170
-
171
-
172
-
173
-
174
-
175
-
176
-
177
-
178
-
179
-
180
-
181
-
182
-
183
-
184
-
185
-
186
-
187
-
188
-
189
-
190
-
191
-
192
-
193
-
194
-
195
-
196
-
197
-
198
-
199
-
200
-
201
-
202
-
203
-
204
-
205
-
206
-
207
-
208
-
209
-
210
-
211
-
212
-
213
-
214
-
215
-
216
-
217
-
218
-
219
-
220
-
221
-
222
-
223
-
224
-
225
-
226
 |
 |

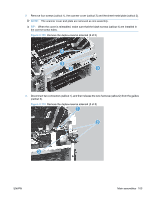
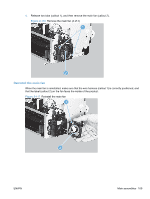
4.
Release two tabs (callout 1), and then remove the main fan (callout 2).
Figure 2-116
Remove the main fan (4 of 4)
1
2
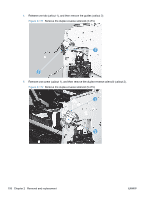
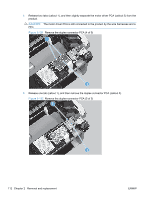
Reinstall the main fan
When the main fan is reinstalled, make sure that the wire harness (callout 1) is correctly positioned, and
that the label (callout 2) on the fan faces the inside of the product.
Figure 2-117
Reinstall the main fan
1
2
ENWW
Main assemblies
109