HP Latex 3100 IQ Troubleshooting guide - Page 2
Troubleshooting Plot.
 |
View all HP Latex 3100 manuals
Add to My Manuals
Save this manual to your list of manuals |
Page 2 highlights
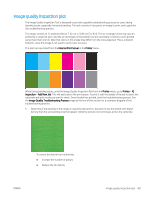
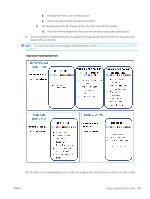
● Check the carriage beam position ● Check the aerosol filters 2. If the banding is not caused by aeroworms, continue with the following procedure: a. Horizontal banding i. Banding present in all colors: ▲ Check the Substrate-Advance Compensation and calibrate if necessary. ( Printer menu > Advance calibration ...) ii. Banding in one or more colors of the top row: a. Execute a check and clean routine, print the printhead status plot and check the number of blocked nozzles. b. If the number of blocked nozzles is roughly greater than 300 in any printhead, perform a hard cleaning routine, selecting the colors affected. c. After executing the cleaning routines, reprint the printhead status plot, the image quality troubleshooting plot, and check the current state of the printheads (expect to see less nozzles clogged) and of the banding. If banding is still visible, increase the number of passes. d. If none of the above work, replace the printhead that caused the banding (the one with most nozzles clogged). e. If the problem persists after replacing the printhead, consider it may be a substrate compatibility issue. iii. Banding in one or more colors of any row: a. Execute printhead alignment and recheck uniformity with the Image Quality Troubleshooting Plot. b. Execute check and clean, print the Printhead Status Plot, and check the number of blocked nozzles. If the number of blocked nozzles is greater than 300 in any printhead, perform a hard cleaning routine, selecting the colors affected. c. Check the Substrate-Advance Compensation and calibrate if necessary. d. Change the type of mask and/or increase the number of passes. e. Reduce the ink density. f. If the problem persists after all the corrective actions, consider it may be a substrate compatibility issue. b. Vertical Banding i. Wide bands: a. Execute printhead alignment. b. Check carriage beam position. c. Decrease curing temperature to reduce deformation. 408 Chapter 11 Troubleshoot print-quality issues ENWW
-
 1
1 -
 2
2 -
 3
3
 |
 |