HP MSA 1040 HP MSA Drive Replacement Instructions (759128-001, March 2014) - Page 2
Verifying drive status, Removing the failed drive, CAUTION, IMPORTANT
 |
View all HP MSA 1040 manuals
Add to My Manuals
Save this manual to your list of manuals |
Page 2 highlights
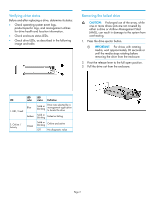
Verifying drive status Before and after replacing a drive, determine its status: • Check operating system event logs, product-specific logs, and management utilities for drive health and location information. • Check enclosure status LEDs. • Check drive LEDs, as described in the following image and table. Removing the failed drive CAUTION: Prolonged use of the array, while one or more drives slots are not covered by either a drive or Airflow Management Sled (AMS), can result in damage to the system from overheating. 1. Press the drive ejector button. IMPORTANT: For drives with rotating media, wait approximately 30 seconds or until the media stops rotating before removing the drive from the enclosure. 2. Pivot the release lever to the full open position. 3. Pull the drive out from the enclosure. LED 1. UID / Fault 2. Online / Activity LED color Blue Amber Green LED status Definition Solid or blinking Drive was selected by a management application to locate the drive Solid or blinking Failed or failing Solid or blinking Online and active Off No diagnostic value Page 2
-
 1
1 -
 2
2 -
 3
3 -
 4
4
 |
 |
