HP MSA 1040 HP MSA Drive Replacement Instructions (759128-001, March 2014) - Page 3
Installing the replacement drive, Verifying proper operation, Working with failed drives, spares - user guide
 |
View all HP MSA 1040 manuals
Add to My Manuals
Save this manual to your list of manuals |
Page 3 highlights
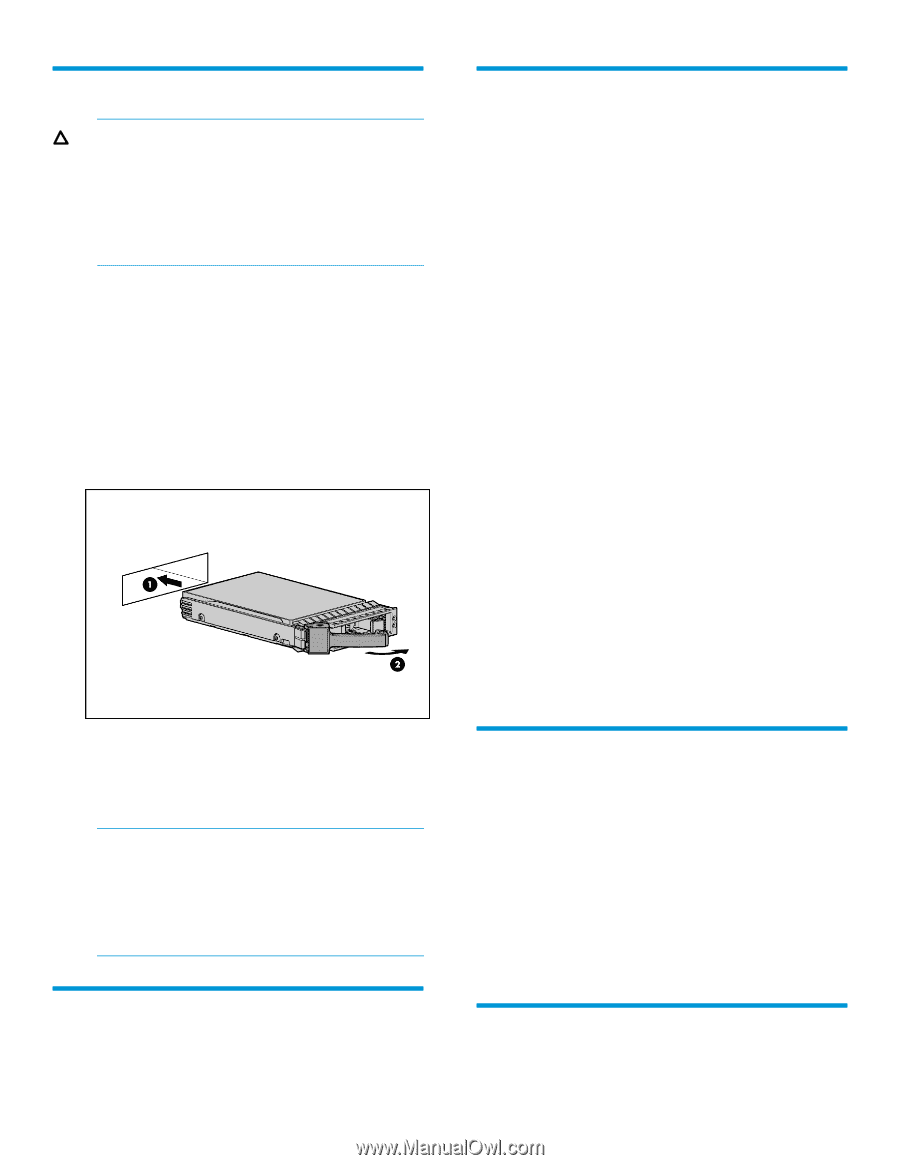
Installing the replacement drive CAUTION: Wait approximately 30 seconds after removing the failed drive and before installing the replacement drive. This timeframe allows the enclosure to recognize that a drive was removed from the enclosure and can then recognize the replacement drive when it is installed. 1. On the replacement drive, prepare the drive by pressing the drive ejector button and pivoting the release lever to the full open position. 2. Insert the replacement drive into the drive enclosure, sliding the drive into the drive enclosure as far as it will go. As the drive meets the backplane, the release lever automatically begins to rotate closed. 3. Press firmly on the release lever to ensure that the drive is fully seated. Working with failed drives, spares, and replacement drives When dynamic sparing is enabled and a drive fails in a fault-tolerant vdisk, if compatible drives are available, the storage system automatically uses the drives to reconstruct the vdisk. Vdisk reconstruction does not require I/O to be stopped, so the vdisk can continue to be used while the reconstruct utility runs. If dynamic sparing is not enabled, you must manually set a compatible drive as a spare for the rebuild to start. When a failed drive is rebuilt onto a spare, the spare becomes the new drive in the vdisk and the original drive that failed is unused and is no longer part of the vdisk. To make the replacement drive available for use as a spare: 1. In the SMU, make sure that the status of the drive slot in which the replacement drive is installed is Available. All new drives should be Available. If the status is a different value, see the user guides or guided troubleshooting listed under Resources for the HP MSA 2040 or the HP MSA 1040, and determine the appropriate action. 2. When the replacement drive is online and Available, configure the drive to be a dedicated spare or a global spare. For information about vdisk reconstruction and using the SMU, see the HP website documentation listed under Resources. 4. Wait approximately 30 seconds for the system to discover the drive. 5. Go to the SMU or CLI and confirm that the drive is available for use. NOTE: In an FDE-secured system, any drive that does not already have vdisk information is automatically secured using the system lock keys. See user guides for including or repurposing Self-Encrypting Drives (SEDs) that have existing vdisk metadata. Updating firmware After installing any new component, verify that it is running the latest firmware. Go to the HP Support Center website and navigate to the HP MSA 2040 or HP MSA 1040 enclosure model. If newer firmware is available, download the firmware from the Web to your local system and install the latest version on the drive. For more information on firmware updates, see the applicable SMU reference guide, CLI reference guide, or product user guide listed under Resources. Verifying proper operation Confirm that the drive is operating normally. See "Verifying drive status" (page 2). Returning the failed module In materials shipped with the replacement, HP specifies whether the failed component must be returned. Follow the provided instructions. Page 3
-
 1
1 -
 2
2 -
 3
3 -
 4
4
 |
 |