HP Media Center m477.uk HP Pavilion Desktop PCs - (English) Creating DVDs and - Page 13
Editing Video Files in ShowBiz 2
 |
View all HP Media Center m477.uk manuals
Add to My Manuals
Save this manual to your list of manuals |
Page 13 highlights
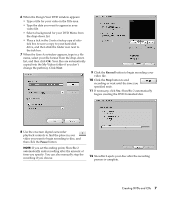
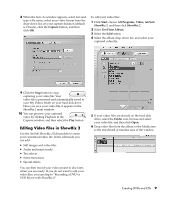
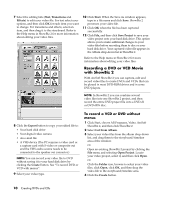
8 When the Save As window appears, select text and type a file name, select your video format from the drop-down list, set your capture duration (default is 2 hours), click the Capture button, and then click OK. To edit your video files: 1 Click Start, choose All Programs, Video, ArcSoft ShowBiz 2, and then click ShowBiz 2. 2 Select Get From Album. 3 Select the Edit button. 4 Select the album drop-down list, and select your captured video file. 9 Click the Stop button to stop capturing your video file. Your video file is processed and automatically saved to your My Videos folder on your hard disk drive. Once you save your video file, it appears in the ShowBiz 2 main window. 10 You can preview your captured video by clicking Playback in the Capture window, and then select the Play button. Editing Video Files in ShowBiz 2 Use the ArcSoft ShowBiz 2 Edit module to create your customised video file. In the edit mode you can add: • Still images and video files. • Audio and music tracks. • Text effects. • Scene transitions. • Special effects. You can then record your video project to disc later, when you are ready. If you do not want to edit your video files, you can skip to "Recording a DVD or VCD Movie with ShowBiz 2". 5 If your video files are already on the hard disk drive, select the Folder icon, browse and select your video file, and then click Open. 6 Drag video files from the album or the Media area to the storyboard or timeline area of the window. Creating DVDs and CDs 9
-
 1
1 -
2
-
3
-
4
-
5
-
6
-
7
-
 8
8 -
 9
9 -
 10
10 -
 11
11 -
 12
12 -
 13
13 -
 14
14 -
 15
15 -
 16
16 -
 17
17 -
 18
18 -
19
-
20
-
21
-
22
-
23
-
24
 |
 |
