HP Mini 110-1118VU Service Guide - Page 92
and remove the microphone receiver
 |
View all HP Mini 110-1118VU manuals
Add to My Manuals
Save this manual to your list of manuals |
Page 92 highlights
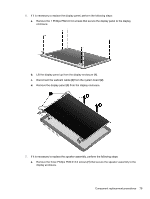
b. Pull the receiver through the tabs (2), and remove the microphone receiver (3). 12. If it is necessary to replace the wireless antenna transceivers and cables, detach the cables from the adhesive (1) that secures them to the display enclosure, and then remove the cables (2). Reverse this procedure to reassemble and install the display assembly. 82 Chapter 4 Removal and replacement procedures
-
 1
1 -
2
-
3
-
4
-
5
-
6
-
7
-
8
-
9
-
10
-
11
-
12
-
13
-
14
-
15
-
16
-
17
-
18
-
19
-
20
-
21
-
22
-
23
-
24
-
25
-
26
-
27
-
28
-
29
-
30
-
31
-
32
-
33
-
34
-
35
-
36
-
37
-
38
-
39
-
40
-
41
-
42
-
43
-
44
-
45
-
46
-
47
-
48
-
49
-
50
-
51
-
52
-
53
-
54
-
55
-
56
-
57
-
58
-
59
-
60
-
61
-
62
-
63
-
64
-
65
-
66
-
67
-
68
-
69
-
70
-
71
-
72
-
73
-
74
-
75
-
76
-
77
-
78
-
79
-
80
-
81
-
82
-
83
-
84
-
85
-
86
-
 87
87 -
 88
88 -
 89
89 -
 90
90 -
 91
91 -
 92
92 -
 93
93 -
 94
94 -
 95
95 -
 96
96 -
 97
97 -
98
-
99
-
100
-
101
-
102
-
103
-
104
-
105
-
106
-
107
-
108
-
109
-
110
-
111
-
112
-
113
-
114
-
115
-
116
-
117
-
118
-
119
-
120
-
121
-
122
-
123
-
124
-
125
-
126
-
127
-
128
-
129
-
130
-
131
-
132
-
133
-
134
-
135
-
136
-
137
-
138
-
139
-
140
-
141
-
142
-
143
-
144
-
145
-
146
-
147
-
148
-
149
-
150
-
151
-
152
-
153
-
154
-
155
 |
 |

b.
Pull the receiver through the tabs
(2)
, and remove the microphone receiver
(3)
.
12.
If it is necessary to replace the wireless antenna transceivers and cables, detach the cables from
the adhesive
(1)
that secures them to the display enclosure, and then remove the cables
(2)
.
Reverse this procedure to reassemble and install the display assembly.
82
Chapter 4
Removal and replacement procedures