HP Mini 110-1122TU Service Guide - Page 86
Description, Spare part number, Display Hinge Kit, Speaker assembly, Display panel, Webcam module
 |
View all HP Mini 110-1122TU manuals
Add to My Manuals
Save this manual to your list of manuals |
Page 86 highlights
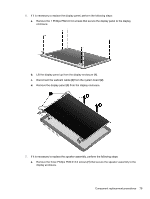
Description Display Hinge Kit (Includes left and right display panel hinges) Speaker assembly (includes left and right cables) Display panel 10.1-inch high-definition AntiGlare 10.1-inch standard-definition AntiGlare 10.1-inch WSVGA AntiGlare Webcam module Display Cable Kit (includes display/webcam cable and WLAN antennas) ● For use with high-definition and standard-definition display panels only ● For use with WSVGA display panels only Microphone assembly WWAN antennas Display enclosure (includes logo) For use with black HP models only For use with pink HP models only For use with white HP models only For use with blue HP models only For use with HP Mini 110 by Studio Tord Boontje models only For use with Compaq models only Display Screw Kit (not illustrated) Spare part number 537658-001 537621-001 572405-001 537656-001 579570-001 537660-001 537657-001 579571-001 581323-001 537655-001 537651-001 537654-001 537653-001 591649-001 579576-001 537645-001 538510-001 Before removing the display assembly, follow these steps: 1. Shut down the device. If you are unsure whether the device is off or in Hibernation, turn the device on, and then shut it down through the operating system. 2. Disconnect all external devices connected to the device. 3. Disconnect the power from the device by first unplugging the power cord from the AC outlet and then unplugging the AC adapter from the device. 4. Remove the battery (see Battery on page 44). 76 Chapter 4 Removal and replacement procedures
-
 1
1 -
2
-
3
-
4
-
5
-
6
-
7
-
8
-
9
-
10
-
11
-
12
-
13
-
14
-
15
-
16
-
17
-
18
-
19
-
20
-
21
-
22
-
23
-
24
-
25
-
26
-
27
-
28
-
29
-
30
-
31
-
32
-
33
-
34
-
35
-
36
-
37
-
38
-
39
-
40
-
41
-
42
-
43
-
44
-
45
-
46
-
47
-
48
-
49
-
50
-
51
-
52
-
53
-
54
-
55
-
56
-
57
-
58
-
59
-
60
-
61
-
62
-
63
-
64
-
65
-
66
-
67
-
68
-
69
-
70
-
71
-
72
-
73
-
74
-
75
-
76
-
77
-
78
-
79
-
80
-
 81
81 -
 82
82 -
 83
83 -
 84
84 -
 85
85 -
 86
86 -
 87
87 -
 88
88 -
 89
89 -
 90
90 -
 91
91 -
92
-
93
-
94
-
95
-
96
-
97
-
98
-
99
-
100
-
101
-
102
-
103
-
104
-
105
-
106
-
107
-
108
-
109
-
110
-
111
-
112
-
113
-
114
-
115
-
116
-
117
-
118
-
119
-
120
-
121
-
122
-
123
-
124
-
125
-
126
-
127
-
128
-
129
-
130
-
131
-
132
-
133
-
134
-
135
-
136
-
137
-
138
-
139
-
140
-
141
-
142
-
143
-
144
-
145
-
146
-
147
-
148
-
149
-
150
-
151
-
152
-
153
-
154
-
155
 |
 |
