HP Mp3130 HP L1619a smart attachment module - (English) User Guide - Page 10
Setting Up the Module, To install the attachment module - parts
 |
UPC - 829160021447
View all HP Mp3130 manuals
Add to My Manuals
Save this manual to your list of manuals |
Page 10 highlights
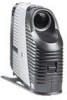
Setting Up the Projector Setting Up the Module This section describes how to set up the module. ■ "To install the attachment module" on page 10 ■ "To install a CompactFlash wireless card" on page 12 ■ "To set up the projector for wired network access" on page 13 ■ "To set up the projector for a wireless connection" on page 15 To install the attachment module 1. Turn off the projector and, after it cools, unplug the power cord. Temporarily unplug any cables attached to the projector. 2. Attach the module to the back of the projector. Engage the upper hooks in the upper slots on the projector 1, then press the lower part of the module until the M1 connector and side tabs lock in place 2. 3. Connect power and turn on the projector. The attach light on the top of the module turns on if the module is properly attached. ✎ If the projector displays a message saying you must update the firmware for the projector or the accessory module, see "To update the firmware" on page 51. The projector might not work properly if the components have incompatible firmware. 10 User's Guide
-
 1
1 -
2
-
3
-
4
-
 5
5 -
 6
6 -
 7
7 -
 8
8 -
 9
9 -
 10
10 -
 11
11 -
 12
12 -
 13
13 -
 14
14 -
 15
15 -
16
-
17
-
18
-
19
-
20
-
21
-
22
-
23
-
24
-
25
-
26
-
27
-
28
-
29
-
30
-
31
-
32
-
33
-
34
-
35
-
36
-
37
-
38
-
39
-
40
-
41
-
42
-
43
-
44
-
45
-
46
-
47
-
48
-
49
-
50
-
51
-
52
-
53
-
54
-
55
-
56
-
57
-
58
-
59
-
60
-
61
-
62
-
63
-
64
-
65
-
66
-
67
-
68
-
69
-
70
-
71
-
72
 |
 |